Tomcat-Integrate-Windows-Authentication-With-Spnego
官方文档
- Windows 集成身份验证
- Windows Authentication
- 服务主体名称
- Windows Authentication How-To
- Tomcat Windows 认证
- Tomcat Windows 认证
Windows域认证流程
SPNEGO使用
客户端(浏览器)设置参考
一、Tomcat配置
- tomcat 版本为 9.0.85
- JDK 版本为 jdk 1.8
以下用~表示Tomcat安装目录: D:\Develop\apache-tomcat-9.0.85
1. 添加 Spnego 依赖 spnego.jar
版本依赖关系
| Tomcat | JDK | spnego |
|---|---|---|
| Tomcat 8 | Java 8 | spnego-r9.jar |
| Tomcat 9 | Java 11+ | spnego-r9.jar |
| Tomcat 10+ | Java 11+ | spnego-jakarta-2.0.jar |
将下载的依赖包放入 tomcat/lib/ 目录下,例如: ~\lib\spnego-r9.jar
2. 修改 web.xml 文件
修改 ~\conf\web.xml,添加以下内容
<!--==================== SPNEGO FILTER - Kerberos SSO ===================== -->
<filter>
    <filter-name>SpnegoHttpFilter</filter-name>
    <filter-class>net.sourceforge.spnego.SpnegoHttpFilter</filter-class>

    <init-param>
        <param-name>spnego.allow.basic</param-name>
        <param-value>true</param-value>
    </init-param>

    <init-param>
        <param-name>spnego.allow.localhost</param-name>
        <param-value>true</param-value>
    </init-param>

    <init-param>
        <param-name>spnego.allow.unsecure.basic</param-name>
        <param-value>true</param-value>
    </init-param>

    <init-param>
        <param-name>spnego.login.client.module</param-name>
        <param-value>spnego-client</param-value>
    </init-param>

    <init-param>
        <param-name>spnego.krb5.conf</param-name>
        <param-value>krb5.conf</param-value>
    </init-param>

    <init-param>
        <param-name>spnego.login.conf</param-name>
        <param-value>login.conf</param-value>
    </init-param>

    <init-param>
        <!-- 此处配置 AD域账号,用于服务端的认证 -->
        <param-name>spnego.preauth.username</param-name>
        <param-value>pc01</param-value>
    </init-param>

    <init-param>
        <!-- 此处配置 AD域账号对应的密码,用于服务端的认证 -->
        <param-name>spnego.preauth.password</param-name>
        <param-value>Admin123</param-value>
    </init-param>

    <init-param>
        <param-name>spnego.login.server.module</param-name>
        <param-value>spnego-server</param-value>
    </init-param>

    <init-param>
        <param-name>spnego.prompt.ntlm</param-name>
        <param-value>true</param-value>
    </init-param>

    <init-param>
        <param-name>spnego.logger.level</param-name>
        <param-value>1</param-value>
    </init-param>
</filter>

<filter-mapping>
    <filter-name>SpnegoHttpFilter</filter-name>
    <url-pattern>*.jsp</url-pattern>
</filter-mapping>
3. 创建krb5.conf和login.conf
添加~/krb5.conf
[libdefaults]
default_realm = DEV.LOCAL
# 如果未在 ~/conf/web.xml 配置域账号,则需要配置keytab
# default_keytab_name = FILE:C:\apache-tomcat-9.0.85\conf\tomcat.keytab
# 加密算法,根据【AD域-用户及计算机管理-用户-账户-账号选项】设置值选择
default_tkt_enctypes = aes256-cts aes256-cts-hmac-sha1-96 aes128-cts-hmac-sha1-96 aes128-cts rc4-hmac des3-cbc-sha1 des-cbc-md5 des-cbc-crc arcfour-hmac arcfour-hmac-md5
default_tgs_enctypes = aes256-cts aes256-cts-hmac-sha1-96 aes128-cts-hmac-sha1-96 aes128-cts rc4-hmac des3-cbc-sha1 des-cbc-md5 des-cbc-crc arcfour-hmac arcfour-hmac-md5
permitted_enctypes   = aes256-cts aes256-cts-hmac-sha1-96 aes128-cts-hmac-sha1-96 aes128-cts rc4-hmac des3-cbc-sha1 des-cbc-md5 des-cbc-crc arcfour-hmac arcfour-hmac-md5
forwardable=true

[realms]
DEV.LOCAL = {
    # AD域服务器的地址
    kdc = win-dc01.dev.local
    default_domain = DEV.LOCAL
}

[domain_realm]
dev.local= DEV.LOCAL
.dev.local= DEV.LOCAL
添加~/login.conf
spnego-client {
	com.sun.security.auth.module.Krb5LoginModule required;
};

spnego-server {
	com.sun.security.auth.module.Krb5LoginModule required
	storeKey=true
	isInitiator=false;
};
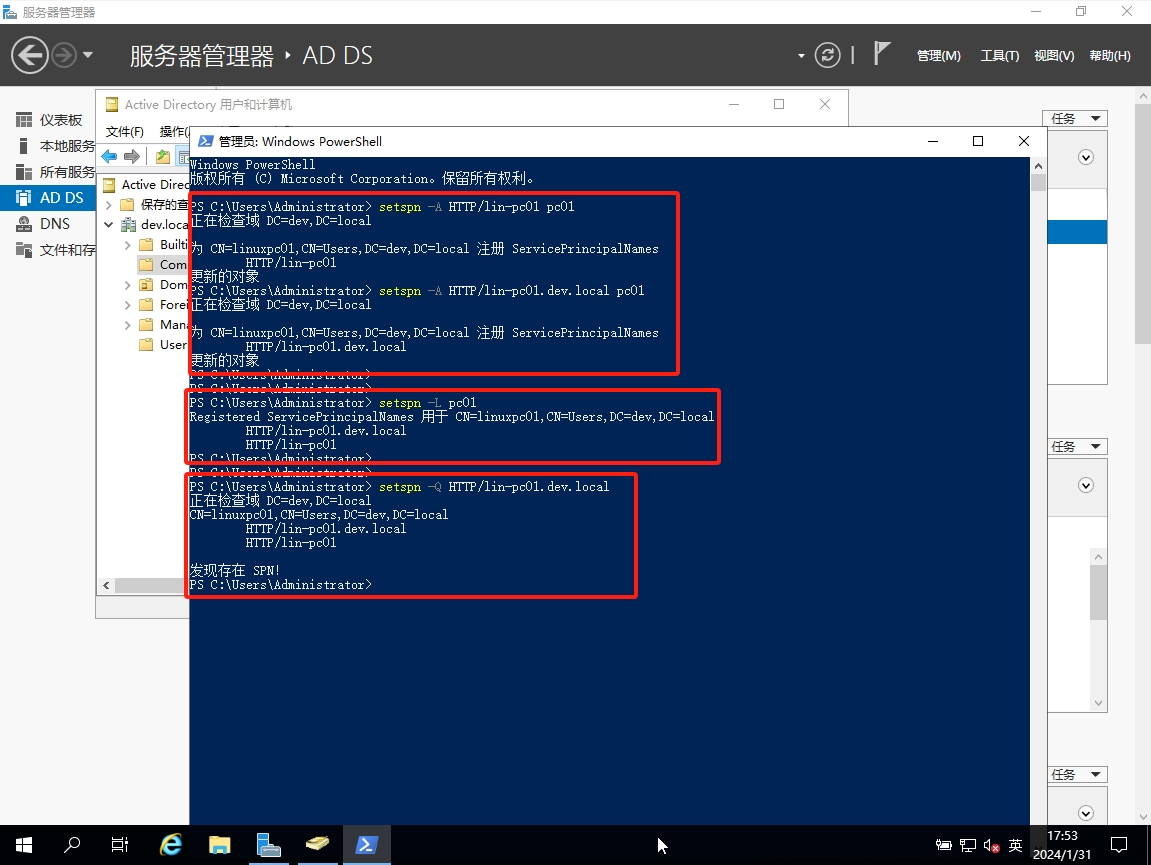
4. 注册SPN(Service Principal Name)
一个SPN只能对应一个用户名,一个用户可以有多个SPN
# 查看帮助
setspn --help

# 添加SPN
setspn -A HTTP/lin-pc01                 pc01
setspn -A HTTP/lin-pc01.dev.local       pc01

setspn -A HTTP/win-pc01                 pc02
setspn -A HTTP/win-pc01.dev.local       pc02

# 查看账号关联的SPN
setspn -L pc01

# 删除账号关联的SPN
setspn -D HTTP/lin-pc01                 pc01

# 查询SPN信息
setspn -Q HTTP/lin-pc01.dev.local
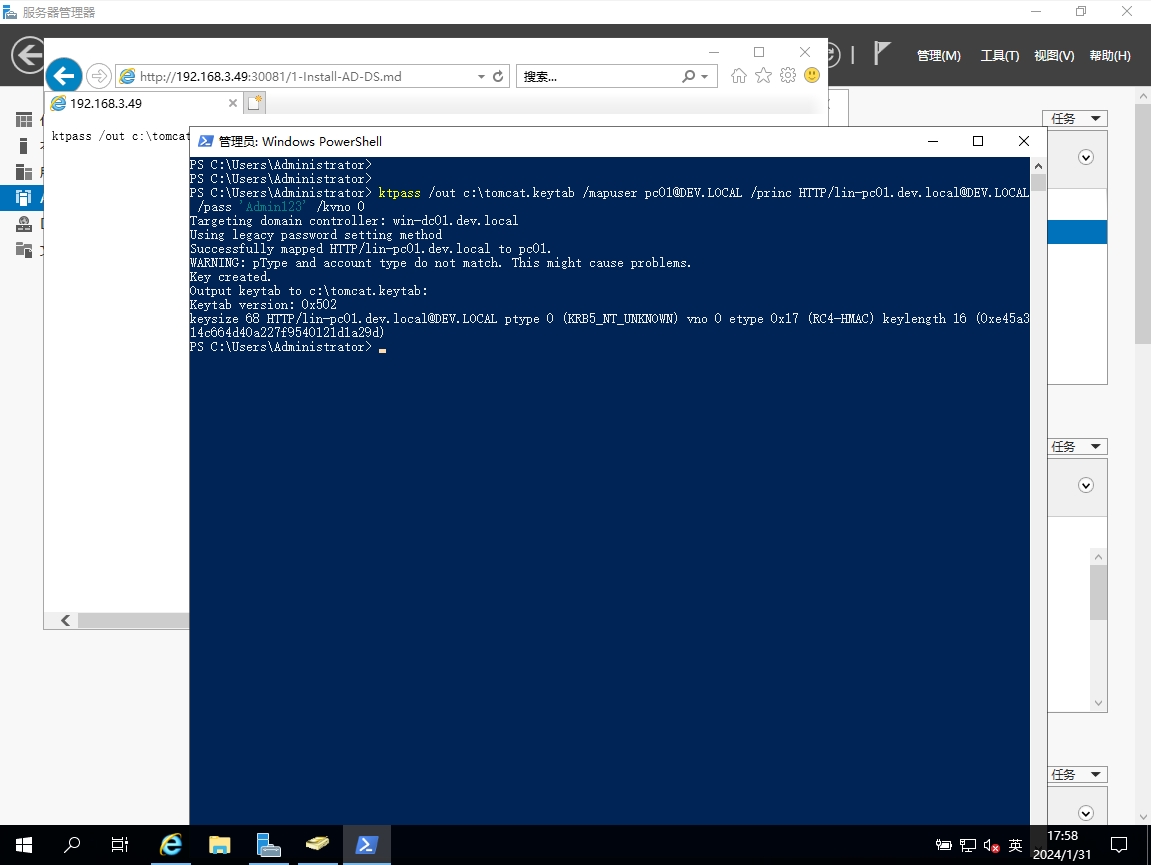
生成tomcat.keytab
# /out      输出文件路径
# /mapuser  映射用户
# /princ    关联的计算机
# /pass     映射用户的密码
# /kvno     版本
ktpass /out c:\tomcat.keytab /mapuser pc01@DEV.LOCAL /princ HTTP/lin-pc01.dev.local@DEV.LOCAL /pass 'Admin123' /kvno 0

ktpass /princ HTTP/YOUR_COMPUTER_NAME_HERE@YOUR_DOMAIN_HERE.COM /mapuser YOUR_USER_HERE /pass YOUR_PASSWORD_HERE /Target YOUR_DOMAIN_HERE.COM /out YOUR_KEYTAB_FILENAME_HERE.keytab /kvno 0 /crypto RC4-HMAC-NT /ptype KRB5_NT_PRINCIPAL
5. 测试配置文件
import java.io.File;
import java.io.FileNotFoundException;
import java.security.NoSuchAlgorithmException;

import javax.security.auth.callback.Callback;
import javax.security.auth.callback.CallbackHandler;
import javax.security.auth.callback.NameCallback;
import javax.security.auth.callback.PasswordCallback;
import javax.security.auth.login.Configuration;
import javax.security.auth.login.LoginContext;

public final class HelloKDC {

    private HelloKDC() {
        // default private
    }

    public static void main(final String[] args) throws Exception {

    	// Domain (pre-authentication) account
        final String username = "pc01";

        // Password for the pre-auth acct.
        final String password = "Admin123";

        // Name of our krb5 config file
        final String krbfile = "krb5.conf";

        // Name of our login config file
        final String loginfile = "login.conf";

        // Name of our login module
        final String module = "spnego-client";

        // set some system properties
        System.setProperty("java.security.krb5.conf", krbfile);
        System.setProperty("java.security.auth.login.config", loginfile);
        //System.setProperty("sun.security.krb5.debug", true);

        // assert
        HelloKDC.validate(username, password, krbfile, loginfile, module);

        final CallbackHandler handler =
            HelloKDC.getUsernamePasswordHandler(username, password);

        final LoginContext loginContext = new LoginContext(module, handler);

        // attempt to login
        loginContext.login();

        // output some info
        System.out.println("Subject=" + loginContext.getSubject());

        // logout
        loginContext.logout();

        System.out.println("Connection test successful.");
    }

    private static void validate(final String username, final String password
        , final String krbfile, final String loginfile, final String moduleName)
        throws FileNotFoundException, NoSuchAlgorithmException {

        // confirm username was provided
        if (null == username || username.isEmpty()) {
            throw new IllegalArgumentException("Must provide a username");
        }

        // confirm password was provided
        if (null == password || password.isEmpty()) {
            throw new IllegalArgumentException("Must provide a password");
        }

        // confirm krb5.conf file exists
        if (null == krbfile || krbfile.isEmpty()) {
            throw new IllegalArgumentException("Must provide a krb5 file");
        } else {
            final File file = new File(krbfile);
            if (!file.exists()) {
                throw new FileNotFoundException(krbfile);
            }
        }

        // confirm loginfile
        if (null == loginfile || loginfile.isEmpty()) {
            throw new IllegalArgumentException("Must provide a login file");
        } else {
            final File file = new File(loginfile);
            if (!file.exists()) {
                throw new FileNotFoundException(loginfile);
            }
        }

        // confirm that runtime loaded the login file
        final Configuration config = Configuration.getConfiguration();

        // confirm that the module name exists in the file
        if (null == config.getAppConfigurationEntry(moduleName)) {
            throw new IllegalArgumentException("The module name "
                    + moduleName + " was not found in the login file");
        }
    }

    private static CallbackHandler getUsernamePasswordHandler(
        final String username, final String password) {

        final CallbackHandler handler = new CallbackHandler() {
            public void handle(final Callback[] callback) {
                for (int i=0; i<callback.length; i++) {
                    if (callback[i] instanceof NameCallback) {
                        final NameCallback nameCallback = (NameCallback) callback[i];
                        nameCallback.setName(username);
                    } else if (callback[i] instanceof PasswordCallback) {
                        final PasswordCallback passCallback = (PasswordCallback) callback[i];
                        passCallback.setPassword(password.toCharArray());
                    } else {
                        System.err.println("Unsupported Callback: "
                                + callback[i].getClass().getName());
                    }
                }
            }
        };

        return handler;
    }
}
# 编译
javac HelloKDC.java

# 运行
java HelloKDC
6. 创建一个 hello_spnego.jsp 文件
添加 ~/webapps/ROOT/hello_spnego.jsp
<html>
<head>
    <title>Hello SPNEGO Example</title>
</head>
<body>
Hello <%= request.getRemoteUser() %> !
</body>
</html>
二、客户端配置
1. 编译 HelloKeytab.java
import java.net.URL;

import net.sourceforge.spnego.SpnegoHttpURLConnection;

public class HelloKeytab {

    public static void main(final String[] args) throws Exception {
        System.setProperty("java.security.krb5.conf", "krb5.conf");
        System.setProperty("sun.security.krb5.debug", "true");
        System.setProperty("java.security.auth.login.config", "client-login.conf");

        SpnegoHttpURLConnection spnego = null;

        try {
            spnego = new SpnegoHttpURLConnection("custom-client");
            spnego.connect(new URL("http://win10.lh9527.com:8080/hello_spnego.jsp"));

            System.out.println("HTTP Status Code: "
                    + spnego.getResponseCode());

            System.out.println("HTTP Status Message: "
                    + spnego.getResponseMessage());

        } finally {
            if (null != spnego) {
                spnego.disconnect();
            }
        }
    }
}
2. 创建 login.conf 文件
client-login.conf
custom-client {
    com.sun.security.auth.module.Krb5LoginModule required
    storeKey=true
    useKeyTab=true
    keyTab="file:///C:/spnego/client-keytab.keytab"
    principal=pyy;
};
3. 创建密钥表文件
ktab.exe -a pyy Admin123 -k client-keytab.keytab

ktab.exe -l -k client-keytab.keytab
4. 测试密钥表文件
javac -cp .;spnego-r9.jar HelloKeytab.java

java -cp .;spnego-r9.jar HelloKeytab
三、服务器配置
1. 编译 HelloKeytab.java
import java.net.URL;

import net.sourceforge.spnego.SpnegoHttpURLConnection;

public class HelloKeytab {

    public static void main(final String[] args) throws Exception {
        System.setProperty("java.security.krb5.conf", "krb5.conf");
        System.setProperty("sun.security.krb5.debug", "true");
        System.setProperty("java.security.auth.login.config", "server-login.conf");

        SpnegoHttpURLConnection spnego = null;

        try {
            spnego = new SpnegoHttpURLConnection("custom-client");
            spnego.connect(new URL("http://win10.lh9527.com:8080/hello_spnego.jsp"));

            System.out.println("HTTP Status Code: "
                    + spnego.getResponseCode());

            System.out.println("HTTP Status Message: "
                    + spnego.getResponseMessage());

        } finally {
            if (null != spnego) {
                spnego.disconnect();
            }
        }
    }
}
2. 创建 login.conf 文件
server-login.conf
custom-client {
    com.sun.security.auth.module.Krb5LoginModule required
    storeKey=true
    useKeyTab=true
    keyTab="file:///C:/spnego/server-keytab.keytab"
    principal=win10;
};
3. 创建密钥表文件
ktab.exe -a win10 Admin123 -k server-keytab.keytab

ktab.exe -l -k server-keytab.keytab
4. 测试密钥表文件
javac -cp .;spnego-r9.jar HelloKeytab.java

java -cp .;spnego-r9.jar HelloKeytab
5. 配置应用程序服务器以使用 keytab 文件
- 将
server-keytab.keytab移至与login.conf文件相同的目录,改名为tomcat.keytab。 - 修改应用服务器的
login.conf文件以反映keytab文件的使用情况。
spnego-client {
	com.sun.security.auth.module.Krb5LoginModule required;
};

spnego-server {
	com.sun.security.auth.module.Krb5LoginModule required
	storeKey=true
	useKeyTab=true
	keyTab="tomcat.keytab"
	principal=win10
	isInitiator=false
	storeKey=true;
};
- 从
web.xml文件中删除用户名和密码
四、认证信息委派
1. AD域账户开启Delegation
在【AD DS域管理 - 用户和计算机 - 用户 - 属性 - 账户 - 账户选项】中,
勾选 Account is trusted for delegation (Windows Server 2019中没有此选项,可能已过期)
2. Tomcat开启Delegation
<init-param>
    <param-name>spnego.prompt.ntlm</param-name>
    <param-value>true</param-value>
</init-param>
<!-- 添加此项,使Tomcat支持delegate -->
<init-param>
    <param-name>spnego.allow.delegation</param-name>
    <param-value>true</param-value>
</init-param>
3. 创建一个 hello_delegate.jsp 文件
添加~/webapps/ROOT/hello_delegate.jsp
<!DOCTYPE HTML PUBLIC "-//W3C//DTD HTML 4.01 Transitional//EN">
<%@ page import="java.net.*" %>
<%@ page import="org.ietf.jgss.*" %>
<%@ page import="net.sourceforge.spnego.*" %>
<html>
<head>
    <title>Hello Delegate Example</title>
</head>
<body>
<%
    if (request instanceof DelegateServletRequest) {
        DelegateServletRequest dsr = (DelegateServletRequest) request;
        GSSCredential creds = dsr.getDelegatedCredential();

        if (null == creds) {
            out.print("No delegated creds.");
        } else {
            out.print(creds.getName().toString());

            SpnegoHttpURLConnection spnego =
                new SpnegoHttpURLConnection(creds);

            spnego.connect(new URL("http://win10.lh9527.com:8080/hello_spnego.jsp"));

            out.print("<br />HTTP Status Code: " + spnego.getResponseCode());
            out.print("<br />HTTP Status Message: " + spnego.getResponseMessage());
            spnego.disconnect();
        }

    } else {
        out.print("Request not a delegate.");
    }
%>
</body>
</html>
测试委派
- 复制一个tomcat,分别启动server1, server2
- 访问server1: http://server1:8080/hello_spnego.jsp
- 访问server2: http://server1:8080/hello_spnego.jsp
- 访问server2: http://server1:8080/hello_delegate.jsp
问题解决
1. SPNEGO Checksum failed
- SPNEGO with Tomcat error: GSSException: Failure unspecified at GSS-API level (Mechanism level: Checksum failed)
- GSSContext with null SrcName
- kerberos-spnego-checksum-failed-problem
- Kerberos AD Spnego authentication fails on one machine but not on another
- AES256 Checksum failed
错误信息如下
GSSException: Failure unspecified at GSS-API level (Mechanism level: Checksum failed)
- 检查AD域账号是否已开启
AES-128/AES-256认证 - 检查
krb5.conf中配置的加密方式是否匹配AES-128/AES-256 - 检查浏览器的配置是否正确,Chrome和Edge不需要配置,IE和Firefox需要设置,参考 Client Configuration 部分
- 检查JDK版本,实测
tomcat-9.0.85版本使用jdk 21会报错,改为jdk 1.8就可以正常访问,可以更换JDK版本再测试 - tomcat服务器和tomcat
web.xml中配置的账号需要绑定,即添加SPN步骤