Install-EMQX-Offline-In-CentOS8
一、相关链接
- CentOS官网
- CentOS下载-阿里云镜像站
- Linux依赖包查询 rpm find
- Linux依赖包查询 pkgs
- Linux依赖包查询 aliyun
- Linux依赖包查询 pbone
- EMQX 开源版下载
- EMQX 使用指南
- EMQX 集群配置
- EMQX 集群架构
- EMQX 配置手册
- MQTTX 官网
- Nginx 官网
- HAProxy官网
二、环境介绍
| 名称 | 版本 | 备注 |
|---|---|---|
| 操作系统 | CentOS 8.5.2111 | 阿里云镜像站 CentOS 8.5 |
| CentOS依赖 | - | 阿里云镜像站 BaseOS Packages |
| EMQX安装包 | EMQX-v5.8.5 | RHEL 8(CentOS 8) amd64 / tar.gz |
| 集群网关 | Nginx-1.26.3 | nginx-1.26.3 |
| 集群网关 | HAproxy-3.1.5 | haproxy-3.1.5 |
三、准备工作
由于生产服务器无法连接外网,可以先在本地搭建一套与生产版本一致的虚拟机,所有需要离线安装的软件包都预先在虚拟机中进行安装测试,保证兼容性及依赖包的完整性,避免到生产服务器出现不兼容或缺少依赖的请况。
1. 系统安装
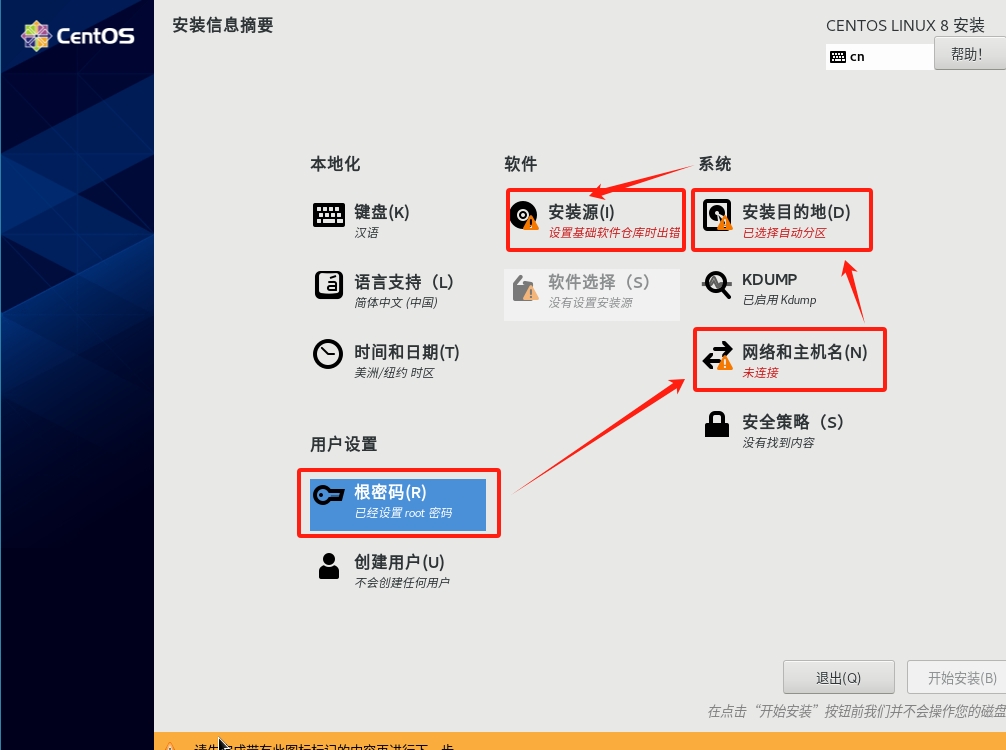
系统安装与CentOS7之前有较大区别,可以参考这篇文章
重点是在安装信息摘要页面,按照以下顺序设置
- Root用户密码
- 网络和主机名 此处的MAC地址需要和虚拟机
设置-网络页面的MAC地址一致 - 安装目的地
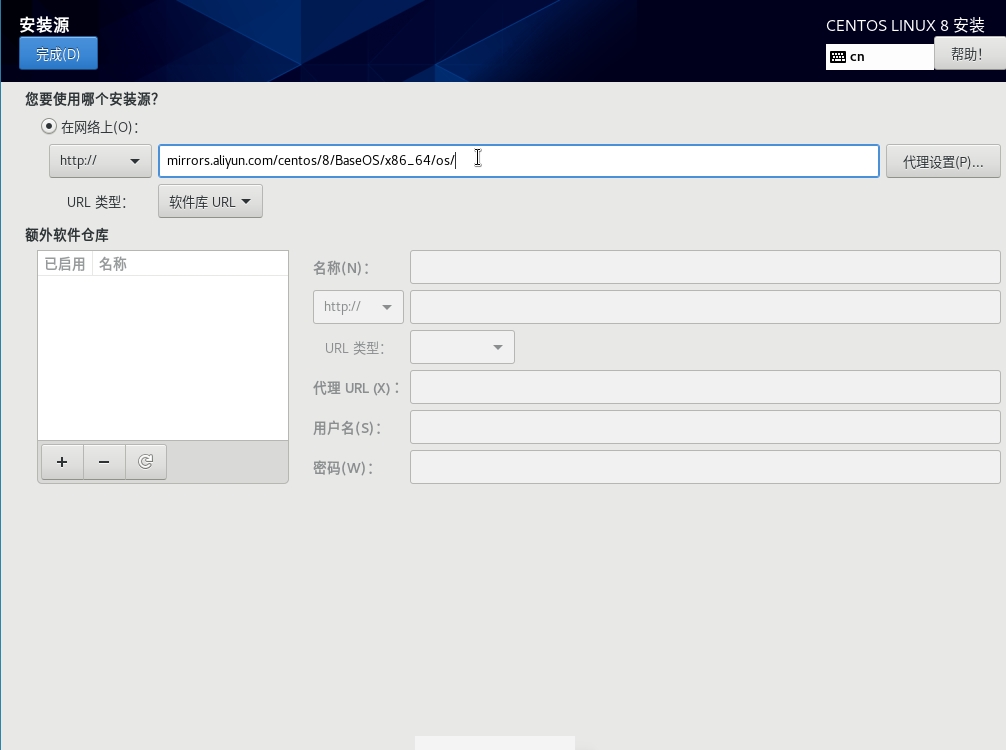
- 安装源
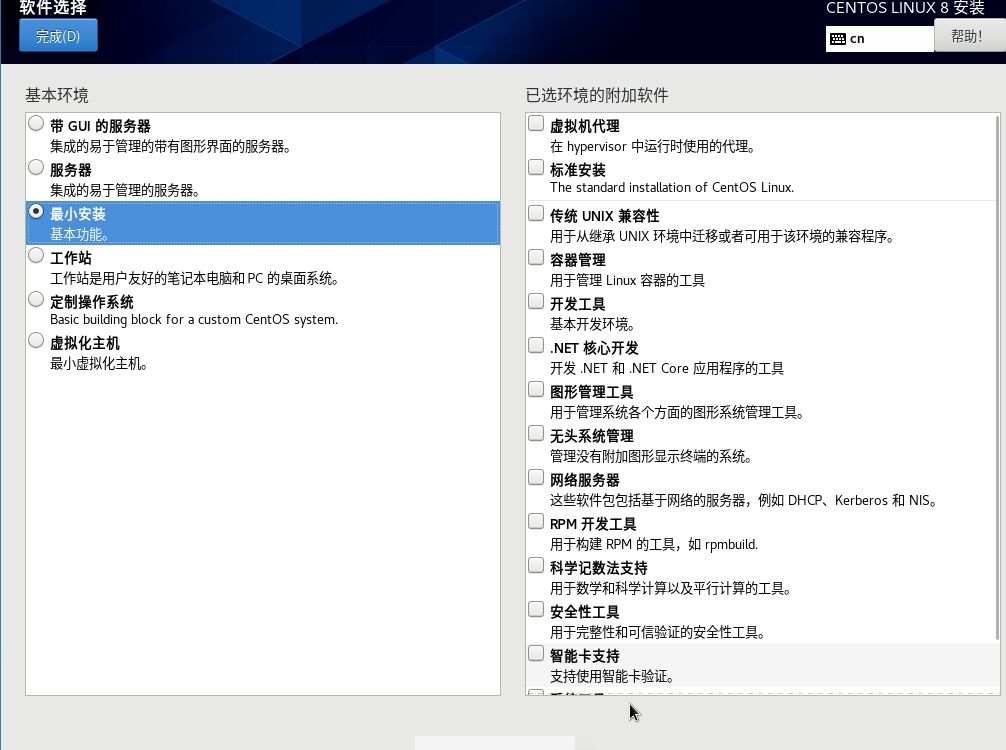
http://mirrors.aliyun.com/centos/8/BaseOS/x86_64/os/ - 软件选择 最小安装(yum ssh curl ping ip)
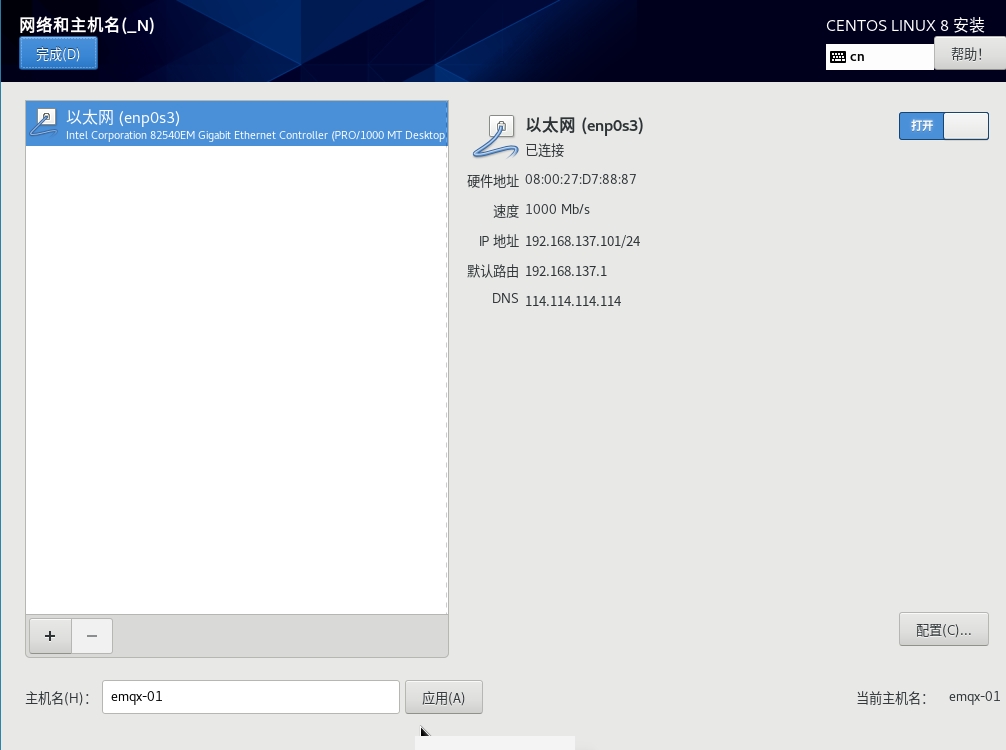
如果要设置固定IP,可以修改网络配置文件,手动设置IP、MAC地址、网关、子网掩码、DNS等信息
# 查看网络配置
cat /etc/sysconfig/network-scripts/ifcfg-enp0s3

# 修改网络配置
vim /etc/sysconfig/network-scripts/ifcfg-enp0s3
BOOTPROTO=static
IPADDR=192.168.137.101
# MACADDR=08:00:27:D7:88:87
HWADDR=08:00:27:D7:88:87
GATEWAY=192.168.137.1
NETMASK=255.255.255.0
DNS1=114.114.114.114

# 重启网络服务
systemctl restart NetworkManager

# 测试与宿主机 公网的网络互通
ping -c4 192.168.137.1
ping -c4 jd.com
2. 修改yum源
Errors during downloading metadata for repository 'appstream':
  - Curl error (6): Couldn't resolve host name for http://mirrorlist.centos.org/?release=8&arch=x86_64&repo=AppStream&infra=stock [Could not resolve host: mirrorlist.centos.org]
错误:为仓库 'appstream' 下载元数据失败 : Cannot prepare internal mirrorlist: Curl error (6): Couldn't resolve host name for http://mirrorlist.centos.org/?release=8&arch=x86_64&repo=AppStream&infra=stock [Could not resolve host: mirrorlist.centos.org]
由于 CentOS 团队已于 2021 年 12 月 31 日对 CentOS Linux 8 停止更新和维护,并从官方镜像中移除 CentOS 8 的所有包,因此导致在使用 yum 源安装或更新会报上述错误,解决方案可参考这篇文章,下面直接用阿里云软件源替换
- 备份软件源
# 进入仓库源文件目录下
cd /etc/yum.repos.d/

# 备份
mkdir /etc/yum.repos.d/backup
mv /etc/yum.repos.d/* /etc/yum.repos.d/backup/
- 使用阿里云软件源
# 如果没有wget,可以用curl下载
# wget http://mirrors.aliyun.com/repo/Centos-8.repo -O /etc/yum.repos.d/CentOS-Linux-BaseOS.repo
curl http://mirrors.aliyun.com/repo/Centos-8.repo -o /etc/yum.repos.d/CentOS-Linux-BaseOS.repo
- 更新软件源
# 清空原有缓存并重新生成
yum clean all && yum makecache

# 更新软件包(可选)
yum update -y
3. 查找依赖包
由于离线安装时无法在线安装依赖包,故需要提前准备好相关的依赖包,如何查询并安装依赖包可以参考这篇文章
- 安装依赖
# 如果无法在线安装,可以在阿里云镜像站找到 https://mirrors.aliyun.com/centos/8.5.2111/BaseOS/x86_64/os/Packages/
yum -y install yum-utils

# 测试下载依赖
mkdir -p /root/lib/{tar,unzip,wget,vim,net-tools}

yumdownloader --resolve --destdir=/root/lib/tar tar
yumdownloader --resolve --destdir=/root/lib/unzip unzip
yumdownloader --resolve --destdir=/root/lib/wget wget
yumdownloader --resolve --destdir=/root/lib/vim vim
yumdownloader --resolve --destdir=/root/lib/net-tools net-tools
- 查看提供某个命令/value的rpm包
yum provides unzip
- 查看 rpm 包所需的全部依赖
yum deplist unzip-6.0-45.el8_4
四、测试机安装EMQX
1. 下载依赖包
yumdownloader --resolve --destdir=/root/lib/tar tar
yumdownloader --resolve --destdir=/root/lib/unzip unzip
yumdownloader --resolve --destdir=/root/lib/wget wget
yumdownloader --resolve --destdir=/root/lib/vim vim
yumdownloader --resolve --destdir=/root/lib/net-tools net-tools
yumdownloader --resolve --destdir=/root/lib/libatomic libatomic
yumdownloader --resolve --destdir=/root/lib/chrony chrony

# 如果openssl版本低于1.1,需要进行升级 openssl version
yumdownloader --resolve --destdir=/root/lib/epel-release epel-release
yumdownloader --resolve --destdir=/root/lib/openssl11 openssl11
yumdownloader --resolve --destdir=/root/lib/openssl11-devel openssl11-devel

# 打包为压缩包,方便下载到本地
tar -zcvf lib.tar.gz ./lib/*

# 将依赖同步到其他服务器
scp -r /root/lib/* root@192.168.137.102:/root/lib/

# 上传到服务器之后解压
tar -zxvf lib.tar.gz -C ./
2. rpm 安装
# 下载 wget https://www.emqx.com/zh/downloads/broker/5.8.5/emqx-5.8.5-el8-amd64.rpm
curl https://packages.emqx.net/emqx-ce/v5.8.5/emqx-5.8.5-el8-amd64.rpm -o emqx-5.8.5-el8-amd64.rpm

# 安装
sudo yum install -y emqx-5.8.5-el8-amd64.rpm

# 启动 停止命令
sudo systemctl start emqx
sudo systemctl status emqx
sudo systemctl stop emqx
sudo systemctl restart emqx

# 查看配置文件
cat /etc/emqx/emqx.conf

# 查询安装的包
sudo rpm -qa | grep emqx

# 卸载
sudo rpm -e emqx-5.8.5-1.el8.x86_64
安装完成后相关文件可以从下面位置找到
/usr/lib/emqx安装文件路径/usr/bin/emqx执行文件路径(软链接)/etc/emqx/配置文件路径/var/log/emqx日志文件路径
3. tar.gz 安装
# 下载 wget https://www.emqx.com/zh/downloads/broker/5.8.5/emqx-5.8.5-el8-amd64.tar.gz
curl https://packages.emqx.net/emqx-ce/v5.8.5/emqx-5.8.5-el8-amd64.tar.gz -o emqx-5.8.5-el8-amd64.tar.gz

# 安装 tar
rpm -ivh ./lib/tar-1.30-5.el8.x86_64.rpm

# 安装
mkdir -p /opt/emqx && tar -zxvf emqx-5.8.5-el8-amd64.tar.gz -C /opt/emqx

# 启动 停止命令
cd /opt/emqx
./bin/emqx start
./bin/emqx stop
./bin/emqx console
安装完成后相关文件可以从下面位置找到
/opt/emqx安装文件路径/opt/emqx/bin执行文件路径/opt/emqx/etc/配置文件路径/opt/emqx/log日志文件路径
4. 将EMQX注册为系统服务
cat /etc/systemd/system/emqx.service

cat > /etc/systemd/system/emqx.service << 'EOF'
[Unit]
Description=EMQX Broker
After=syslog.target network.target

[Service]
Type=forking
ExecStart=/opt/emqx/bin/emqx start
ExecStop=/opt/emqx/bin/emqx stop
ExecReload=/opt/emqx/bin/emqx restart
Restart=on-failure
RestartSec=5s

[Install]
WantedBy=multi-user.target

EOF

# 设置开机自启
systemctl enable emqx

# 启停命令
service emqx start
service emqx stop
service emqx restart
五、集群安装配置
假设现在有三台服务器,其主机名和ip分别如下
| 主机名 | IP |
|---|---|
| emqx-01 | 192.168.137.101 |
| emqx-02 | 192.168.137.102 |
| emqx-03 | 192.168.137.103 |
1. 测试节点网络
修改hosts文件,确保通过域名(主机名)可以相互访问
cat >> /etc/hosts << EOF

192.168.137.101        emqx-01
192.168.137.102        emqx-02
192.168.137.103        emqx-03

EOF
检查网络互通及延迟情况
ping -c4 emqx-01

ping -c4 emqx-02

ping -c4 emqx-03
注意 官方文档要求各节点之间的延迟不高于10ms,过高的延迟可能造成服务不可用
2. 开放服务器端口
为保证集群节点之间的通讯,需要开放以下端口
| 端口 | 描述 |
|---|---|
| 1883 | MQTT监听端口 |
| 8083 | WebSocket监听端口 |
| 18083 | Web控制台端口 |
| 4370 | Erlang 分布式传输端口 |
| 5370 | 集群 RPC 端口,适用于物理机环境 |
| 5369 | 集群 RPC 端口,适用于 Docker 环境 |
firewall-cmd --zone=public --add-port=1883/tcp --permanent
firewall-cmd --zone=public --add-port=8083/tcp --permanent
firewall-cmd --zone=public --add-port=18083/tcp --permanent

firewall-cmd --zone=public --add-port=4370/tcp --permanent
firewall-cmd --zone=public --add-port=5370/tcp --permanent
firewall-cmd --zone=public --add-port=5369/tcp --permanent

firewall-cmd --reload

firewall-cmd --list-port
3. 时间同步配置
由于EMQX集群对服务器的网络延迟有严格要求,所以必须保证各节点之间的时间同步正常且延迟低于10ms,如果服务器上没有时间同步配置,需要安装配置chrony,可以参考这篇文章
- 安装chrony服务
# 检查是否有 ntpd 或 chronyd 服务
systemctl status ntpd
systemctl status chronyd

# 安装chrony
rpm -ivh /root/lib/chrony/timedatex-0.5-3.el8.x86_64.rpm
rpm -ivh /root/lib/chrony/chrony-4.1-1.el8.x86_64.rpm

# 配置文件
cat /etc/chrony.conf
- 启动并设置开机自启
# 启动
systemctl start chronyd
systemctl status chronyd

# 开机自启
systemctl enable chronyd
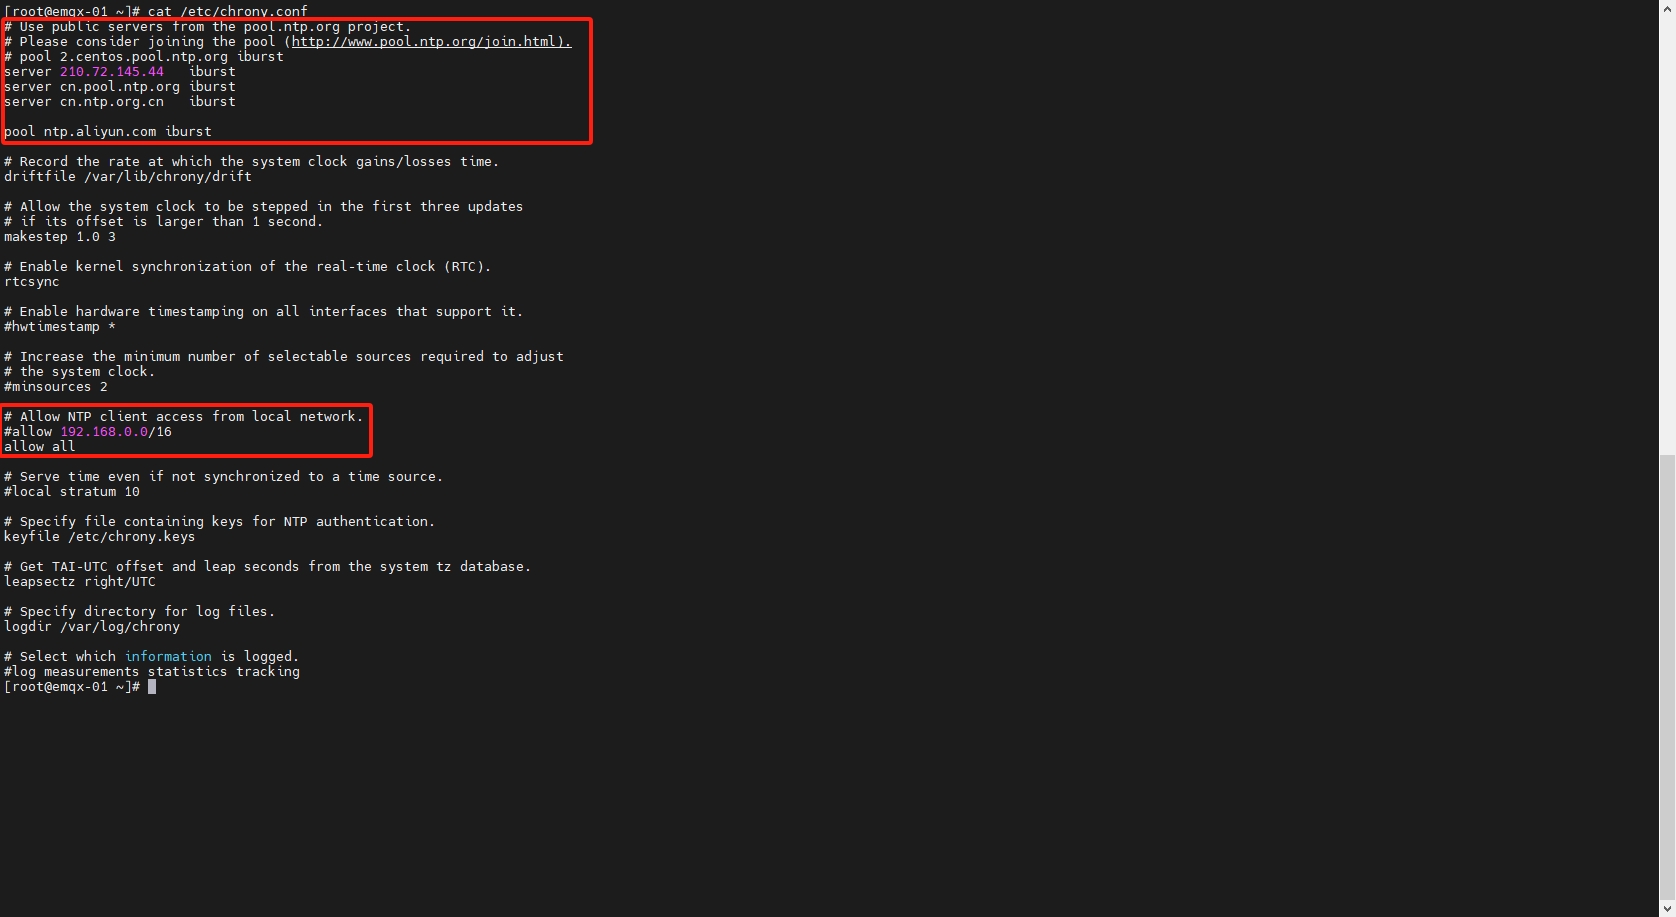
- 配置chrony
# 修改配置文件
vim /etc/chrony.conf

# 允许所有客户端同步时间
allow all

# 上游NTP服务
server 210.72.145.44   iburst
server cn.pool.ntp.org iburst
server cn.ntp.org.cn   iburst

# 阿里
pool   ntp.aliyun.com  iburst
server ntp1.aliyun.com iburst
server ntp2.aliyun.com iburst
server ntp3.aliyun.com iburst
server ntp4.aliyun.com iburst
server ntp5.aliyun.com iburst
server ntp6.aliyun.com iburst
server ntp7.aliyun.com iburst
- 状态检查
# 检查时区
timedatectl
# 修改时区
timedatectl set-timezone Asia/Shanghai
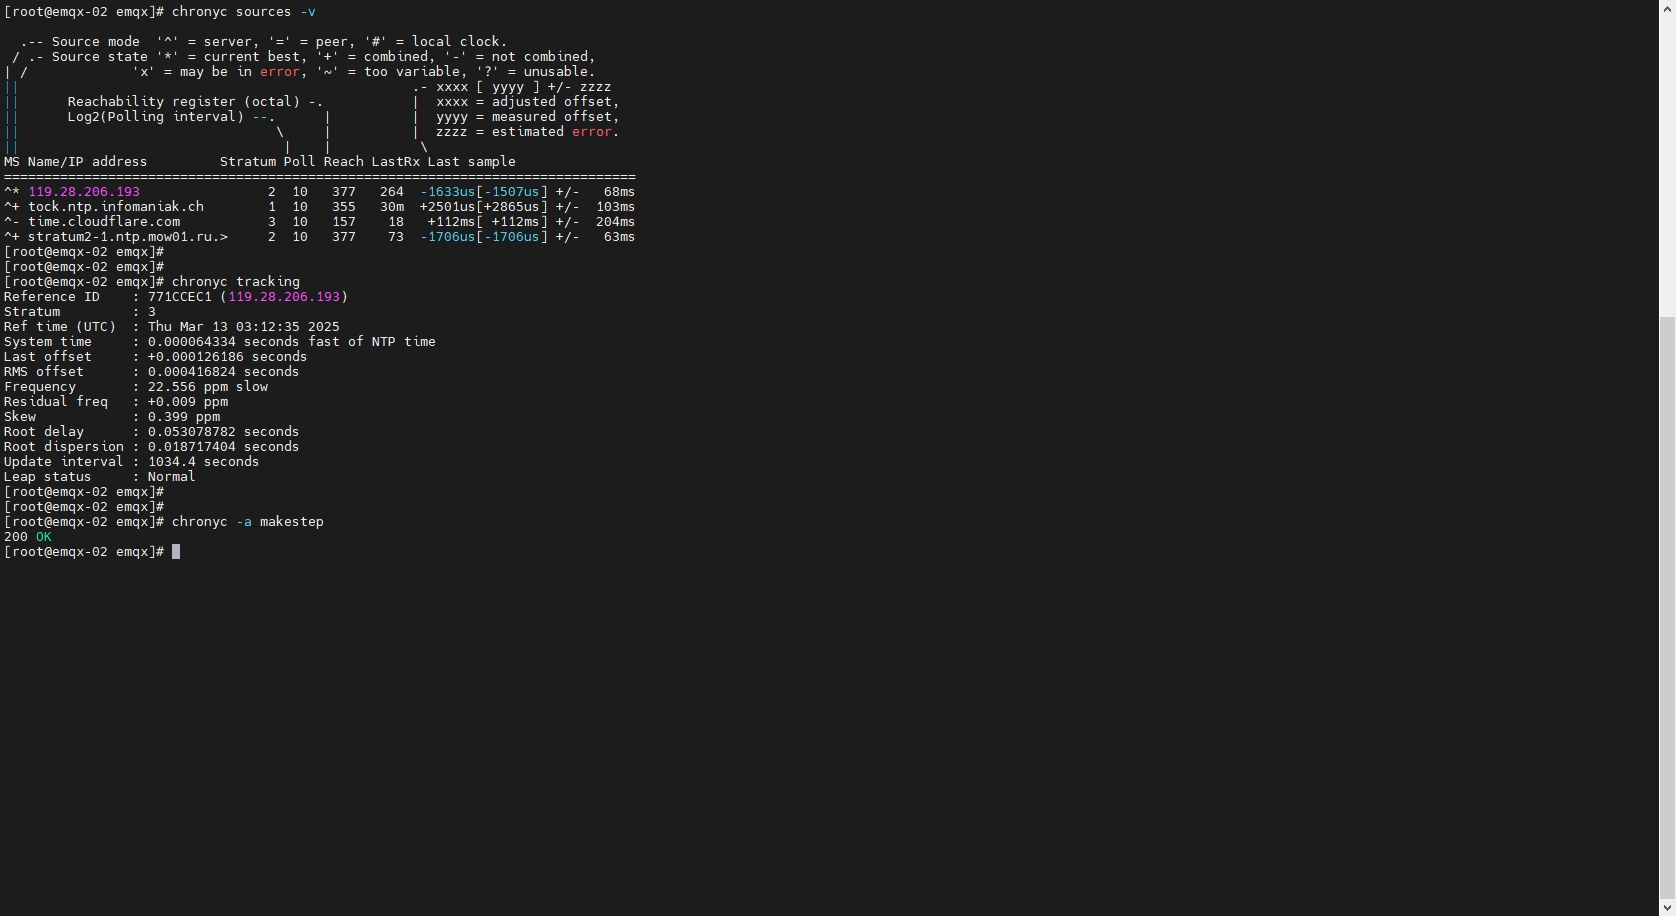
# 查看时间源
chronyc sources -v
# 查看当前时间状态
chronyc tracking
# 手动同步时间
chronyc -a makestep
4. 检测时钟回拨
时钟回拨会导致Erlang虚拟机退出,在正式部署前可以先执行脚本检测以下,避免正式使用时出现这个问题
实测 5.8.5 版本在时钟回拨会退出程序,可以将EMQX版本退回到 5.0.26,这个版本不会因为时钟回拨而退出
- 监测时钟回拨脚本
# 写入脚本
cat > timestamp.sh << 'EOF'
#!/bin/bash

# 基础配置
LOG_DIR="$(dirname "$0")/logs"        # 日志存储目录
RETENTION_DAYS=7                      # 日志保留天数
MONITOR_INTERVAL=600                  # 性能监控间隔(秒)
NTP_CHECK_INTERVAL=7200               # NTP检查间隔(秒)

# 初始化目录
mkdir -p "$LOG_DIR"

# 动态日志路径管理
current_date=$(date +"%Y-%m-%d")
time_log="${LOG_DIR}/time_info_${current_date}.log"
error_log="${LOG_DIR}/time_error_${current_date}.log"
perf_log="${LOG_DIR}/performance_${current_date}.log"

# 初始化跟踪变量
last_timestamp=0
last_ntp_check=$(date +%s)
last_perf_check=$(date +%s)

# 函数:日志切割检查
check_log_rotation() {
    local today=$(date +"%Y-%m-%d")
    if [ "$today" != "$current_date" ]; then
        current_date="$today"
        time_log="${LOG_DIR}/time_info_${current_date}.log"
        error_log="${LOG_DIR}/time_error_${current_date}.log"
        perf_log="${LOG_DIR}/performance_${current_date}.log"
        echo "[INFO] Rotated log files to ${current_date}" >> "$time_log"
    fi
}

# 函数:性能监控
monitor_performance() {
    local timestamp=$(date +"%Y-%m-%d %H:%M:%S")
    local process_stats=$(ps -p $$ -o %cpu,%mem --no-headers | tr -d ' ')
    local loadavg=$(awk '{print $1,$2,$3}' /proc/loadavg)
    local mem_info=$(free -m | awk '/Mem/{printf "%.2f%%", $3/$2*100}')

    echo "[PERF] $timestamp | CPU: ${process_stats%%,*}% | MEM: ${process_stats##*,}% | Load: $loadavg | MemUsage: $mem_info" >> "$perf_log"
}

# 函数:清理旧日志
cleanup_old_logs() {
    find "$LOG_DIR" -maxdepth 1 -type f \( -name "*.log" \) \
        -mtime +$RETENTION_DAYS \
        -exec rm -fv {} \; >> "$time_log" 2>&1
}

# 函数:NTP状态检测
check_ntp_status() {
    # 优先检查ntpstat命令
    if command -v ntpstat >/dev/null 2>&1; then
        if ! ntpstat >/dev/null 2>&1; then
            echo "[WARNING] NTP sync abnormal (ntpstat check failed)" >> "$ERROR_LOG_FILE"
        fi
    # 次选检查chrony服务
    elif systemctl is-active chronyd >/dev/null 2>&1; then
        if ! chronyc tracking >/dev/null 2>&1; then
            echo "[WARNING] Chrony sync abnormal (chronyc check failed)" >> "$ERROR_LOG_FILE"
        fi
    # 最后检查ntpd服务
    elif systemctl is-active ntpd >/dev/null 2>&1; then
        ntpq -pn | grep -q '^+'
        if [ $? -ne 0 ]; then
            echo "[WARNING] NTPD sync abnormal (no reachable servers)" >> "$ERROR_LOG_FILE"
        fi
    else
        echo "[WARNING] No NTP service found (chronyd/ntpd not running)" >> "$ERROR_LOG_FILE"
    fi
}

# 主监控循环
while true; do
    now=$(date +%s)

    # ========== 日志切割检查 ==========
    check_log_rotation

    # ========== 时间记录与回拨检测 ==========
    current_time=$(date +"%Y-%m-%d %H:%M:%S.%3N")
    now_seconds=$(date +%s)
    now_millis=$(date +%3N | sed 's/^0*//')  # 移除前导零

    # 关键修复:显式声明十进制数值
    current_timestamp=$(( now_seconds * 1000 + 10#$now_millis ))

    echo "[TIME] $current_time" >> "$time_log"

    # 时钟回拨检测
    if [ $last_timestamp -gt 0 ] && [ $current_timestamp -lt $last_timestamp ]; then
        error_msg="[ERROR] Clock rollback - ${last_timestamp} - ${current_timestamp} ms | Details: $current_time"
        echo "$error_msg" >> "$error_log"
    fi
    last_timestamp=$current_timestamp

    # ========== 定期任务调度 ==========
    # 性能监控(每10分钟)
    if [ $((now - last_perf_check)) -ge $MONITOR_INTERVAL ]; then
        monitor_performance
        last_perf_check=$now
    fi

    # NTP检查(每2小时)
    if [ $((now - last_ntp_check)) -ge $NTP_CHECK_INTERVAL ]; then
        check_ntp_status
        last_ntp_check=$now
    fi

    # 修复点:使用字符串比较代替数值比较
    if [ "$(date +"%H%M")" = "0005" ]; then
        cleanup_old_logs
        sleep 10
    fi

    sleep 0.9
done

EOF
- 运行脚本,检查日志
# 运行脚本
chmod +x ./timestamp.sh
nohup ./timestamp.sh > /dev/null 2>&1 &

# 查看打印记录
tail -f ./logs/time_info_2025-03-13.log

tail -f ./logs/time_error_2025-03-13.log

tail -f ./logs/performance_2025-03-13.log
5. 试运行EMQX
- 下载运行EMQX
# 下载安装包
# curl https://packages.emqx.net/emqx-ce/v5.0.26/emqx-5.0.26-el8-amd64.rpm -o emqx-5.0.26-el8-amd64.rpm
curl https://packages.emqx.net/emqx-ce/v5.0.26/emqx-5.0.26-el8-amd64.tar.gz -o emqx-5.0.26-el8-amd64.tar.gz

# 安装
mkdir -p /opt/emqx && tar -zxvf emqx-5.0.26-el8-amd64.tar.gz -C /opt/emqx

# 控制台启动验证
cd /opt/emqx
./bin/emqx console

# 如果报错缺少 libatomic.so.1,需要手动安装
scp /root/lib/libatomic/* root@192.168.137.102:/root/lib/libatomic/

rpm -ivh /root/lib/libatomic/libatomic-8.5.0-4.el8_5.x86_64.rpm
- 查看EMQX状态
# 启动停止命令
./bin/emqx start
./bin/emqx stop

# 查看服务运行状态
ps -ef | grep emqx

# 查看集群状态
./emqx/bin/emqx ctl cluster status
- 将EMQX注册为系统服务
cat /etc/systemd/system/emqx.service

cat > /etc/systemd/system/emqx.service << 'EOF'
[Unit]
Description=EMQX Broker
After=network.target

[Service]
Type=forking
ExecStart=/opt/emqx/bin/emqx start
ExecStop=/opt/emqx/bin/emqx stop
ExecReload=/opt/emqx/bin/emqx restart
Restart=on-failure
RestartSec=5s

[Install]
WantedBy=multi-user.target

EOF

# 设置开机自启
systemctl enable emqx
6. 集群配置
- 基于 static 节点列表自动集群
- 基于 DNS 自动集群
- 配置手册-Cluster
- 获取真实 IP 和客户端 TSL 证书信息
由于开源版本只能部�署core集群,所以三个节点 role 都定义为 core,
修改
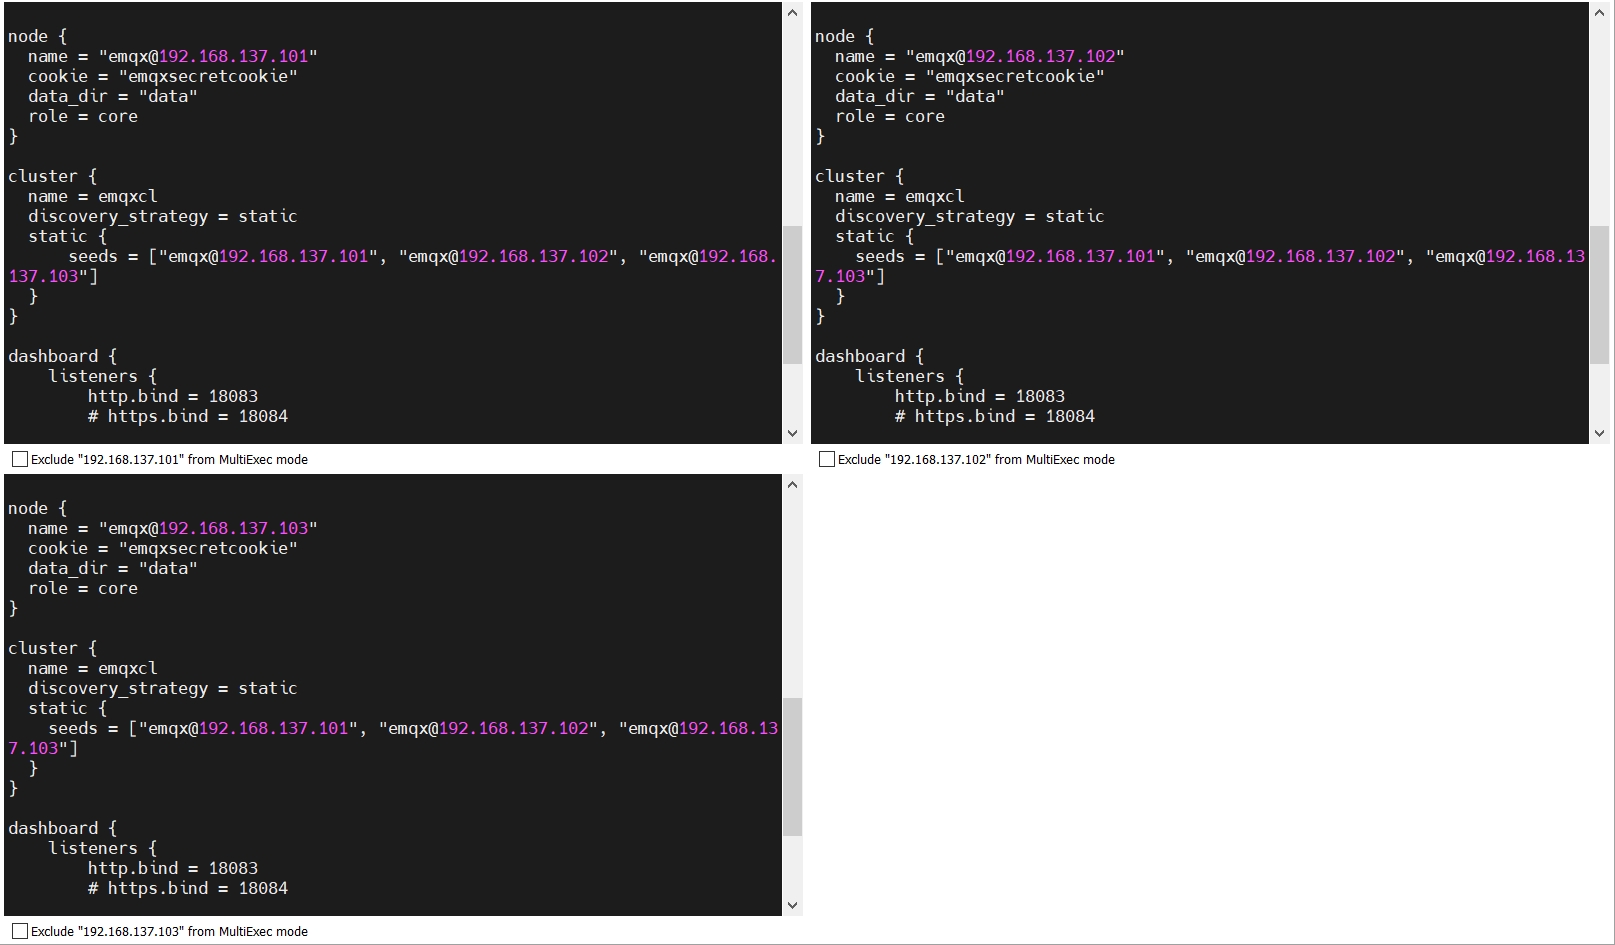
node.name为当前节点的ip,设置集群发现策略discovery_strategy为static以及 节点地址static.seeds
# 备份配置文件
cp ./etc/emqx.conf ./etc/emqx.conf.bakup

# 修改配置文件
vim ./etc/emqx.conf

# 修改以下内容
node {
  name = "emqx@192.168.137.101"
}

cluster{
  autoheal = true
  discovery_strategy = static
  static {
    seeds = ["emqx@192.168.137.101", "emqx@192.168.137.102", "emqx@192.168.137.103"]
  }
}

listeners.tcp.default {
  bind = "0.0.0.0:1883"
  max_connections = 102400

  proxy_protocol = true
}
rm -rf /opt/emqx/etc/emqx.conf

cat > /opt/emqx/etc/emqx.conf << 'EOF'
## NOTE:
## This config file overrides data/configs/cluster.hocon,
## and is merged with environment variables which start with 'EMQX_' prefix.
##
## Config changes made from EMQX dashboard UI, management HTTP API, or CLI
## are stored in data/configs/cluster.hocon.
## To avoid confusion, please do not store the same configs in both files.
##
## See https://docs.emqx.com/en/enterprise/v5.0/configuration/configuration.html
## Configuration full example can be found in emqx.conf.example

node {
  name = "emqx@192.168.137.101"
  cookie = "emqxsecretcookie"
  data_dir = "data"
}

cluster {
  name = emqxcl
  autoheal = true
  discovery_strategy = static
  static {
    seeds = ["emqx@192.168.137.101", "emqx@192.168.137.102", "emqx@192.168.137.103"]
  }
}

listeners.tcp.default {
  bind = "0.0.0.0:1883"
  max_connections = 102400

  proxy_protocol = true
}

dashboard {
    listeners {
        http.bind = 18083
        # 5.0.26 不能有以下配置
        # https.bind = 18084
        # https {
        #     ssl_options {
        #         certfile = "${EMQX_ETC_DIR}/certs/cert.pem"
        #         keyfile = "${EMQX_ETC_DIR}/certs/key.pem"
        #     }
        # }
    }
}

authorization {
  deny_action = ignore
  no_match = allow
  cache = { enable = true }
}

EOF
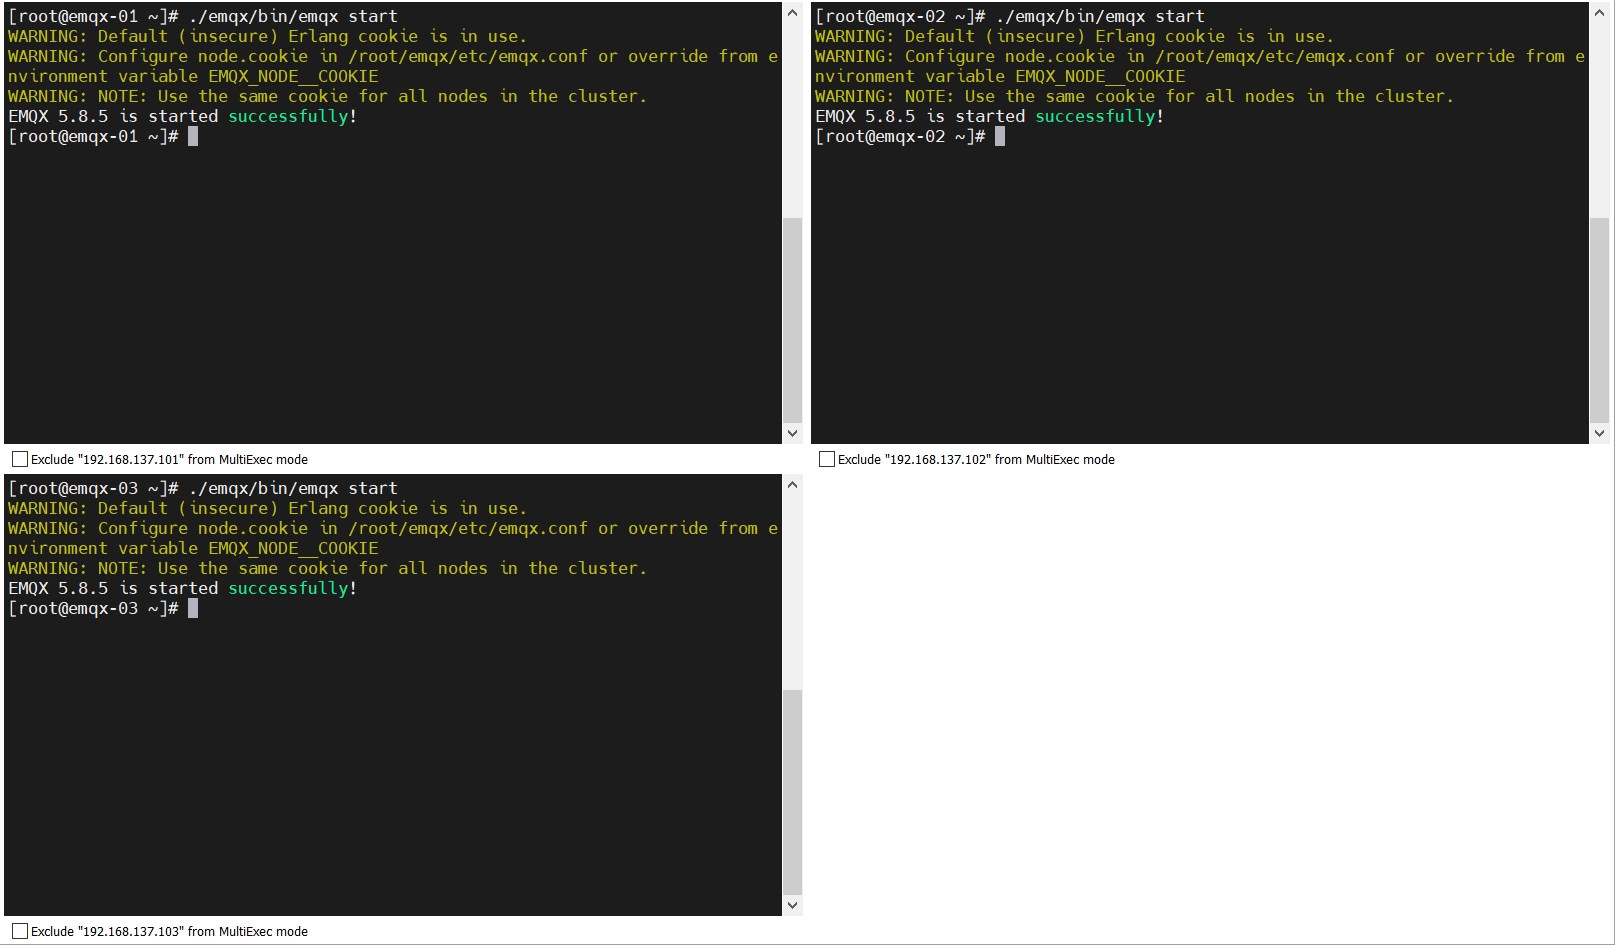
7. 启动EMQX服务
配置完成后启动服务
yum install -y emqx-5.8.5-el8-amd64.rpm

systemctl start emqx

systemctl status emqx

mv /etc/emqx/emqx.conf /etc/emqx/emqx.conf.bakup

mv ./emqx/etc/emqx.conf /etc/emqx/emqx.conf

cat /etc/emqx/emqx.conf

tail -f /var/log/emqx/emqx.log.1

systemctl restart emqx
访问 Dashboard
- 账号密码 admin /public
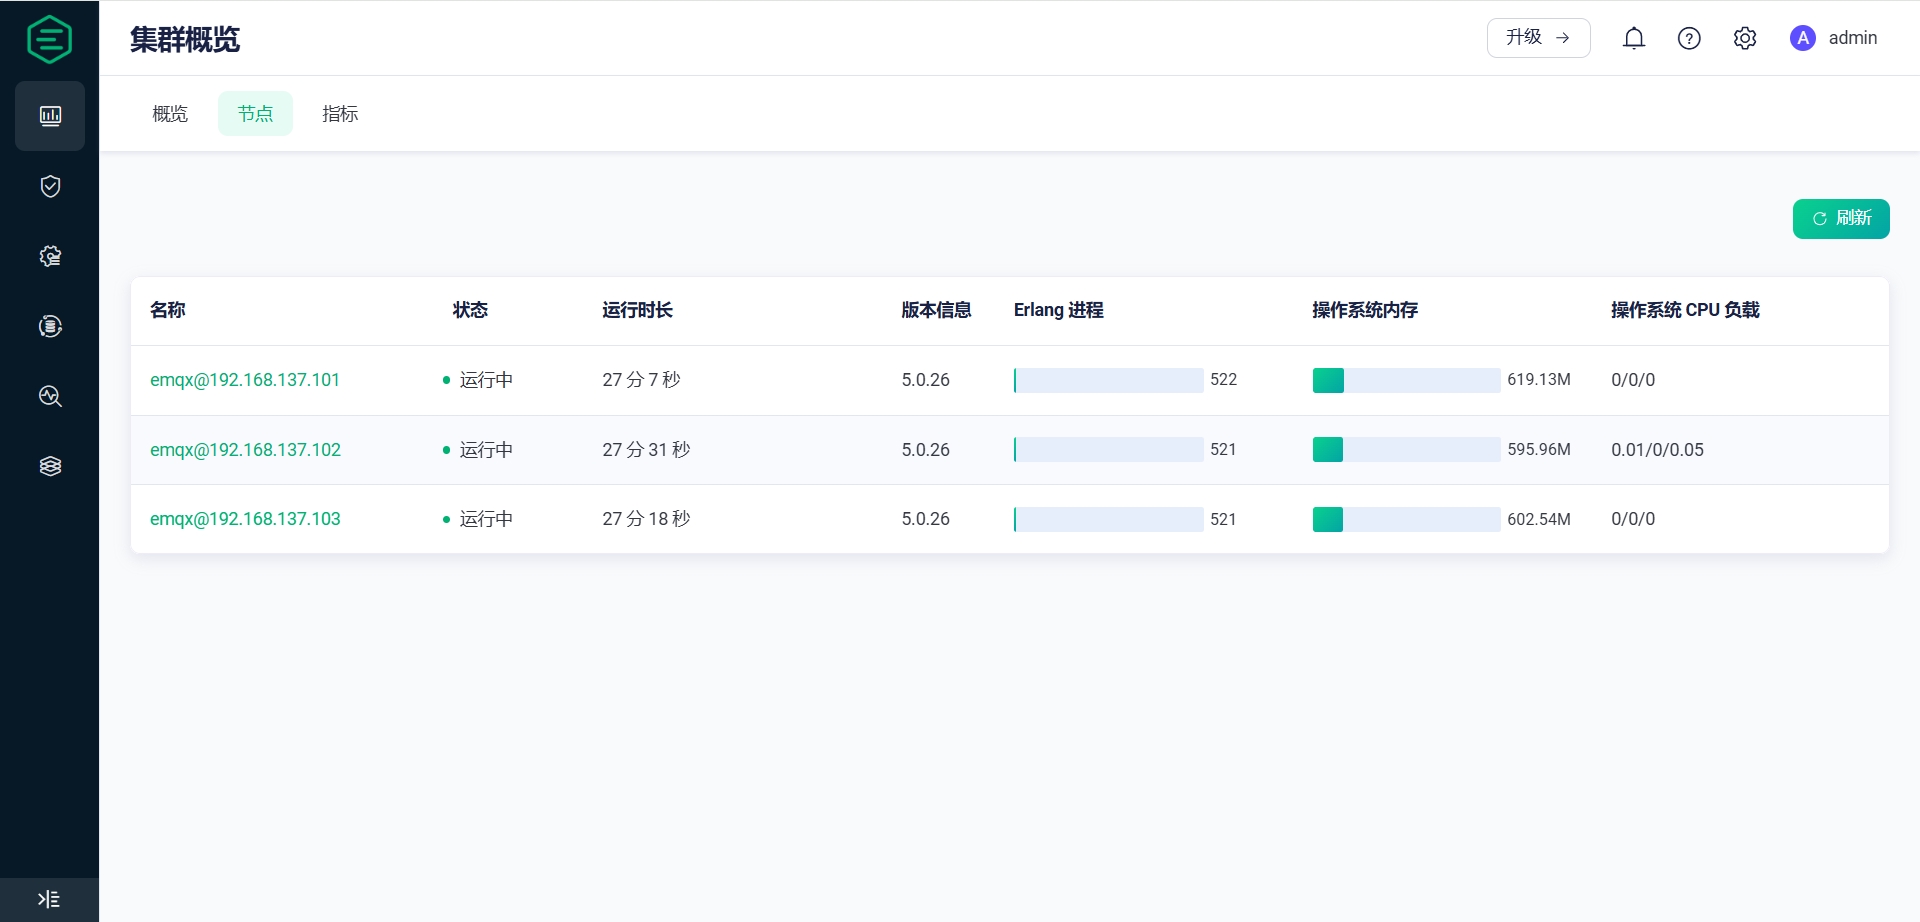
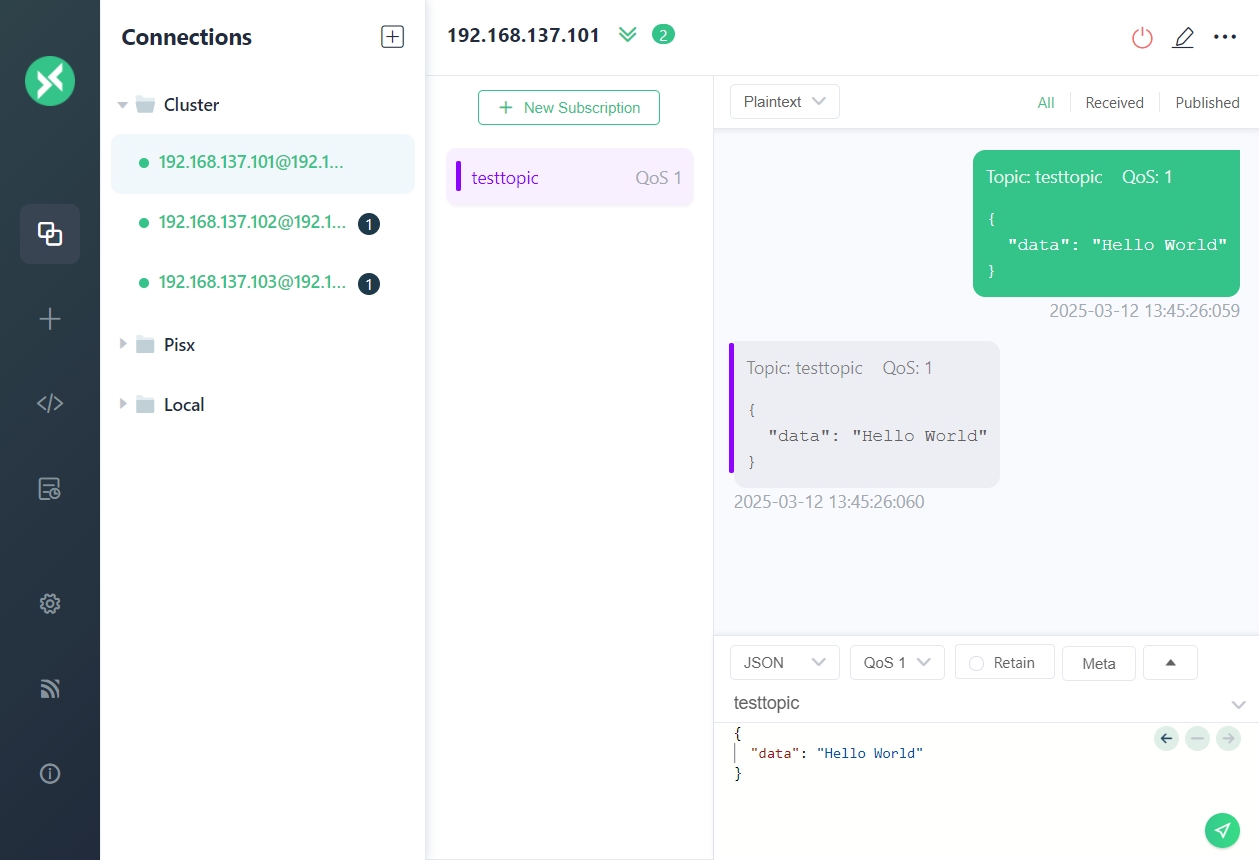
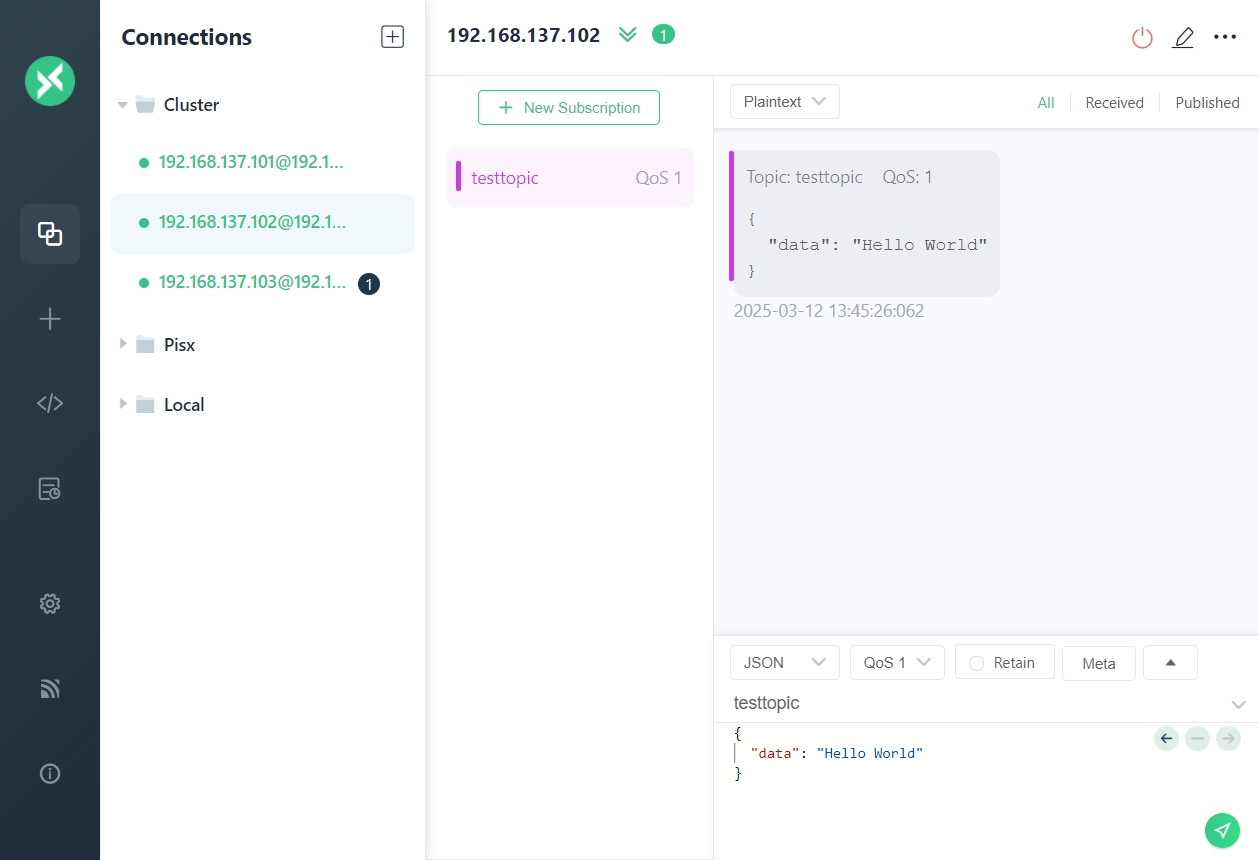
六、验证集群发布与订阅
-
打开MQTTX客户端,连接到集群的各个节点
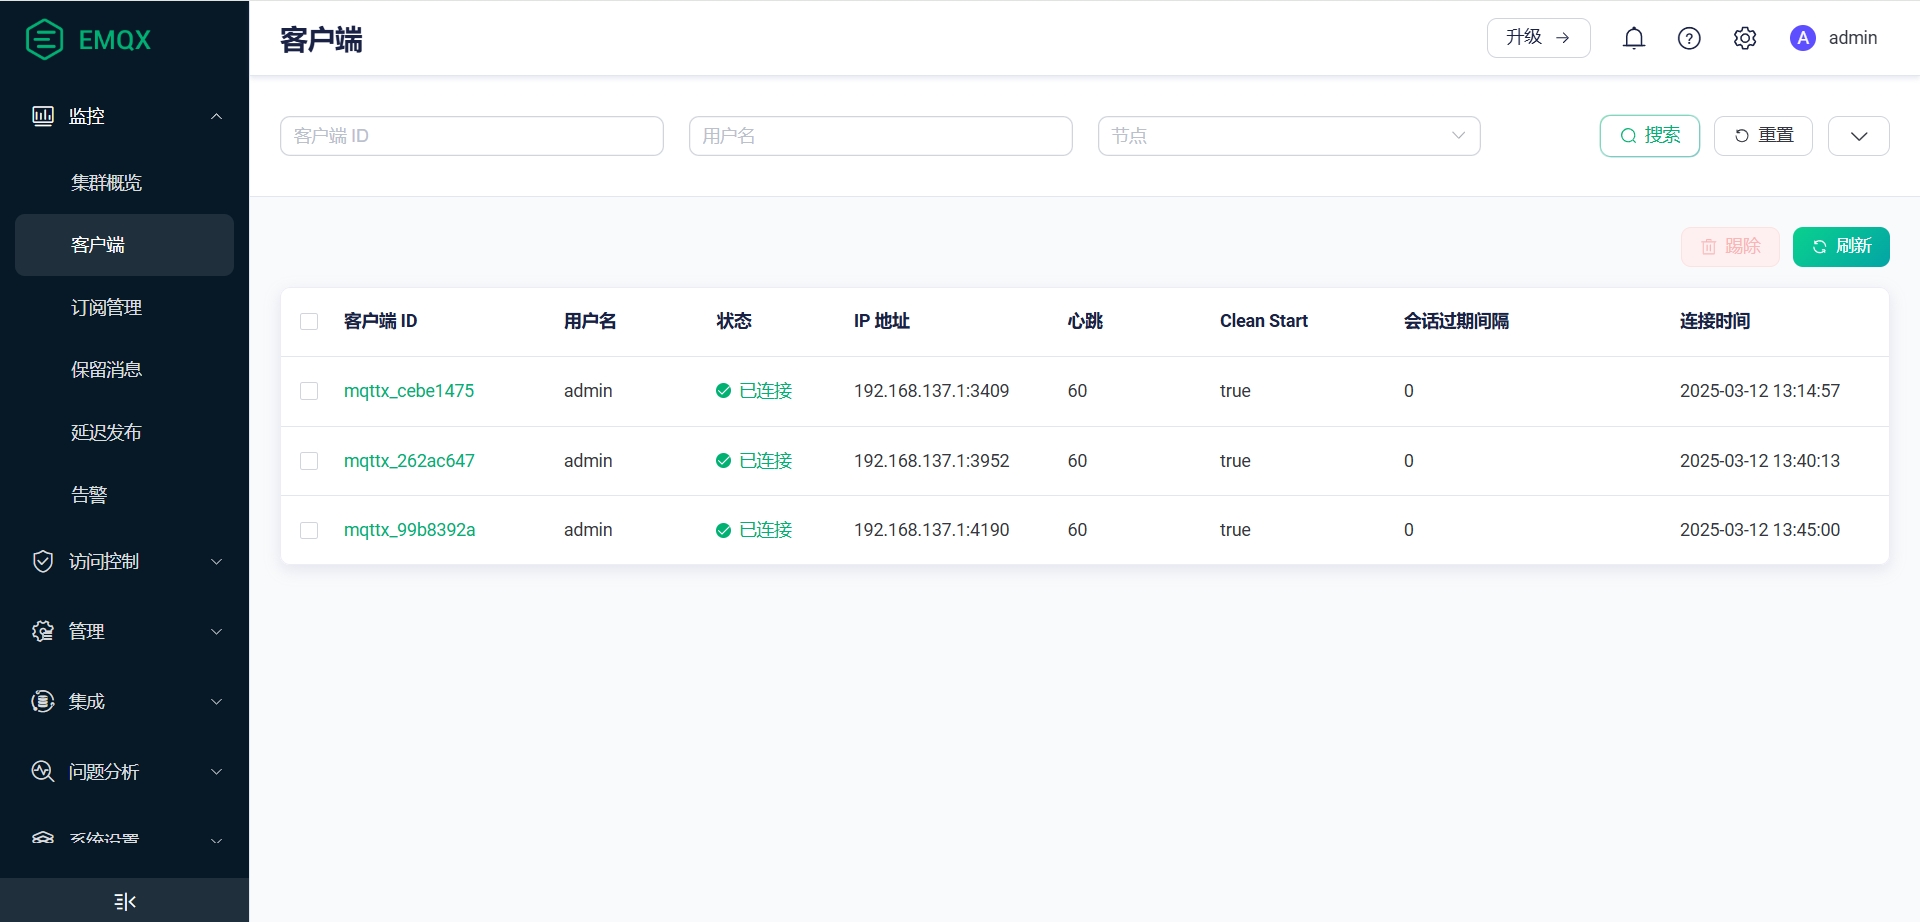
-
每个节点订阅相同的Topic
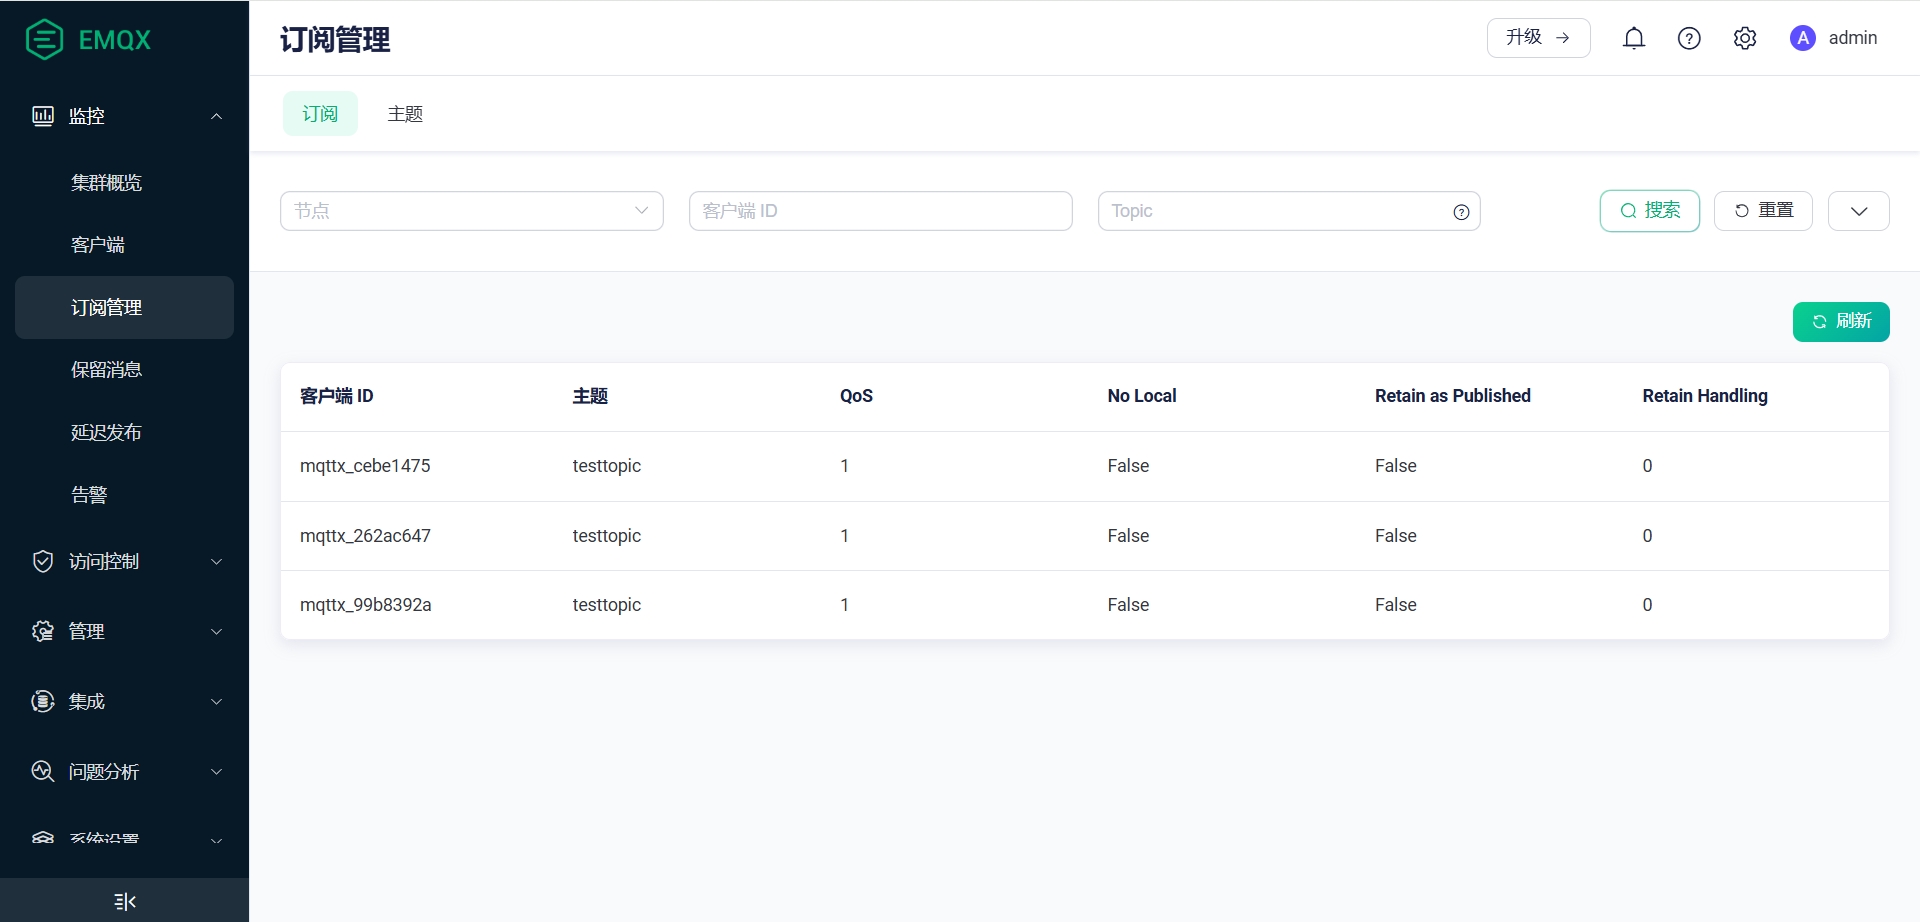

-
从一个节点发出测试消息,可以看到三个节点都收到了订阅消息

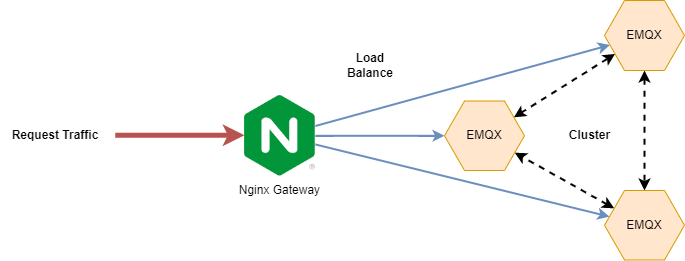
七、Nginx网关负载均衡
负载均衡(Load Balancing)用于均衡多个网络组件的负载,从而优化资源的使用,避免由于组件过载造成故障。负载均衡虽然不是集群中的必备组件,但是能给集群带来一些非常有用的特性,例如当配置在 EMQX 集群中时,将能带来如下优势:
- 均衡 EMQX 的负载,避免出现单节点过载的情况;
- 简化客户端配置,客户端只需连接到负载均衡器上,无需关心集群内部伸缩变化;
- TLS/SSL 终结,减轻 EMQX 集群的负担;
- 提高安全性,有了负载均衡在集群前端,能够通过设置阻止不需要的流量,保护 EMQX 集群免受恶意攻击。
本节我们选择用 Nginx 来作为 EMQX 集群的网关,最终搭建的效果如下所示:
1. 环境准备
1. 安装编译依赖库
# 安装nginx必备依赖库
yum install -y gcc glibc-devel pcre pcre-devel zlib zlib-devel openssl openssl-devel

# 下载依赖包
yumdownloader --resolve --destdir=/root/lib/nginx/make make
yumdownloader --resolve --destdir=/root/lib/nginx/gcc gcc
yumdownloader --resolve --destdir=/root/lib/nginx/glibc-devel glibc-devel
yumdownloader --resolve --destdir=/root/lib/nginx/pcre pcre
yumdownloader --resolve --destdir=/root/lib/nginx/pcre-devel pcre-devel
yumdownloader --resolve --destdir=/root/lib/nginx/zlib zlib
yumdownloader --resolve --destdir=/root/lib/nginx/zlib-devel zlib-devel
yumdownloader --resolve --destdir=/root/lib/nginx/openssl openssl
yumdownloader --resolve --destdir=/root/lib/nginx/openssl-devel openssl-devel


# 安装依赖
rpm -ivh /root/lib/nginx/make/*
rpm -ivh /root/lib/nginx/gcc/*
rpm -ivh /root/lib/nginx/glibc-devel/*
rpm -ivh /root/lib/nginx/pcre/*
rpm -ivh /root/lib/nginx/pcre-devel/*
rpm -ivh /root/lib/nginx/zlib/*
rpm -ivh /root/lib/nginx/zlib-devel/*
rpm -ivh /root/lib/nginx/openssl/*
rpm -ivh /root/lib/nginx/openssl-devel/*
2. 开放代理所需端口
firewall-cmd --zone=public --add-port=80/tcp --permanent
firewall-cmd --zone=public --add-port=443/tcp --permanent

firewall-cmd --zone=public --add-port=1883/tcp --permanent
firewall-cmd --zone=public --add-port=8883/tcp --permanent

firewall-cmd --zone=public --add-port=1080/tcp --permanent
firewall-cmd --zone=public --add-port=1443/tcp --permanent

firewall-cmd --reload

firewall-cmd --list-port
| 端口 | 描述 |
|---|---|
| 80 | Nginx HTTP端口 |
| 443 | Nginx HTTPS端口 |
| 1883 | 反向代理 MQTT端口 |
| 8883 | 反向代理 MQTT SSL端口 |
| 1080 | 反向代理 MQTT WebSocket端口 |
| 1443 | 反向代理 MQTT WebSocket SSL端口 |
2. 下载安装Nginx
1. 下载
# 下载
curl https://nginx.org/download/nginx-1.26.3.tar.gz -o  nginx-1.26.3.tar.gz

# 解压
tar -zxvf nginx-1.26.3.tar.gz
cd nginx-1.26.3
2. 编译配置
# 查看configure 支持的参数,其中包含指定某些路径、开启某些模块、编译中特殊参数
./configure --help | more

# 编译配置
./configure \
  --with-threads \
  --with-http_stub_status_module \
  --with-http_ssl_module \
  --with-http_realip_module \
  --with-stream \
  --with-stream_ssl_module \
  --prefix=/usr/local/nginx

# 输出各种文件的路径
Configuration summary
  + using threads
  + using system PCRE2 library
  + using system OpenSSL library
  + using system zlib library

  nginx path prefix: "/usr/local/nginx"
  nginx binary file: "/usr/local/nginx/sbin/nginx"
  nginx modules path: "/usr/local/nginx/modules"
  nginx configuration prefix: "/usr/local/nginx/conf"
  nginx configuration file: "/usr/local/nginx/conf/nginx.conf"
  nginx pid file: "/usr/local/nginx/logs/nginx.pid"
  nginx error log file: "/usr/local/nginx/logs/error.log"
  nginx http access log file: "/usr/local/nginx/logs/access.log"
  nginx http client request body temporary files: "client_body_temp"
  nginx http proxy temporary files: "proxy_temp"
  nginx http fastcgi temporary files: "fastcgi_temp"
  nginx http uwsgi temporary files: "uwsgi_temp"
  nginx http scgi temporary files: "scgi_temp"
--with-http_ssl_module参数用于添加 SSL 功能支持,--with-stream与--with-stream_ssl_module参数用于添加 TCP 反向代理支持--prefix=/nginx指定安装目录
3. 安装
# 编译
make

# 安装
make install

# 创建 Nginx 用户和组
groupadd -r nginx
useradd -s /sbin/nologin -r -g nginx nginx
4. 将Nginx注册为服务
cat > /etc/systemd/system/nginx.service << 'EOF'
[Unit]
Description=The Nginx HTTP and reverse proxy server
After=syslog.target network.target remote-fs.target nss-lookup.target

[Service]
Type=forking
PIDFile=/usr/local/nginx/logs/nginx.pid
ExecStartPre=/usr/local/nginx/sbin/nginx -t -c /usr/local/nginx/conf/nginx.conf
ExecStart=/usr/local/nginx/sbin/nginx -c /usr/local/nginx/conf/nginx.conf
ExecReload=/bin/kill -s HUP $MAINPID
ExecStop=/bin/kill -s QUIT $MAINPID
PrivateTmp=true

[Install]
WantedBy=multi-user.target

EOF
5. 启动服务并设置开机自启
# 启动
service nginx start

# 停止
service nginx stop

# 状态
service nginx status

# 开机自启
systemctl enable nginx
6. 前端页面访问
-
浏览器打开网页
http://192.168.137.110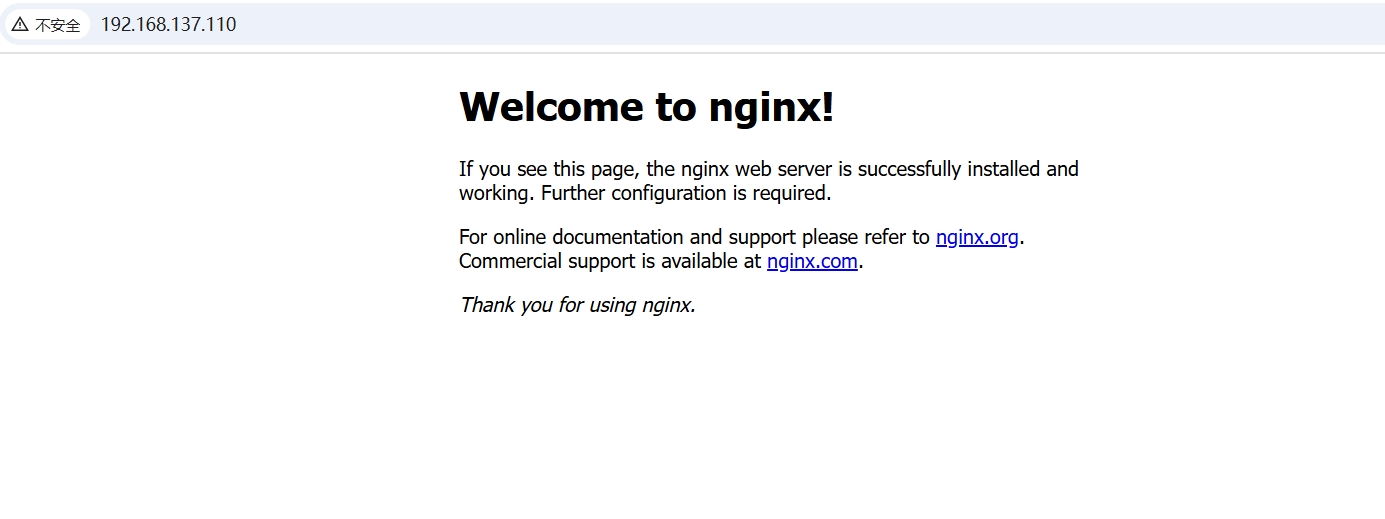
-
在
nginx.conf中加入监控配置
# NGINX 状态监控
location /stats {
  stub_status on;
  access_log off;
}
浏览器打开网页 http://192.168.137.110/stats

3. 配置Nginx
1. 创建配置文件夹,生成SSL证书
mkdir -p /usr/local/nginx/{conf.d,stream,certs}
cd /usr/local/nginx/certs

# 生成私钥,需要输入密码 123456
openssl genrsa -des3 -out emqx.pass.key 2048
# 删除私钥中的密码
openssl rsa -in emqx.pass.key -out emqx.key
# 生成CSR
openssl req -new -key emqx.key -out emqx.csr -subj "/C=CN/ST=Shanghai/L=Shanghai/O=PISX/OU=Diginn/CN=*.example.com"
# 生成证书
openssl x509 -req -days 3650 -in emqx.csr -signkey emqx.key -out emqx.pem
2. 主配置文件 nginx.conf
#user  nobody;
worker_processes  1;

#error_log  logs/error.log;
#error_log  logs/error.log  notice;
#error_log  logs/error.log  info;

#pid        logs/nginx.pid;


events {
    worker_connections  1024;
}


http {
    include       mime.types;
    default_type  application/octet-stream;

    #log_format  main  '$remote_addr - $remote_user [$time_local] "$request" '
    #                  '$status $body_bytes_sent "$http_referer" '
    #                  '"$http_user_agent" "$http_x_forwarded_for"';

    #access_log  logs/access.log  main;

    sendfile        on;
    #tcp_nopush     on;

    #keepalive_timeout  0;
    keepalive_timeout  65;

    server {
        listen       80;
        server_name  localhost;

        #charset koi8-r;

        #access_log  logs/host.access.log  main;

        location / {
            root   html;
            index  index.html index.htm;
        }

        # NGINX 状态监控
        location /stats {
          stub_status on;
          access_log off;
        }

        #error_page  404              /404.html;

        # redirect server error pages to the static page /50x.html
        #
        error_page   500 502 503 504  /50x.html;
        location = /50x.html {
            root   html;
        }
    }

    include /usr/local/nginx/conf.d/*.conf;
}

stream {

  log_format  proxy '$remote_addr - [$time_local] '
                 '$protocol $status $bytes_sent $bytes_received '
                 '$session_time - "$upstream_addr" '
                 '"$upstream_bytes_sent" "$upstream_bytes_received" "$upstream_connect_time"';

  access_log  logs/tcp_access.log proxy;
  error_log   logs/tcp_error.log;

  # 引入 stream 配置
  include     /usr/local/nginx/stream.d/*.conf;

}
3. MQTT协议配置文件 /usr/local/nginx/stream/mqtt.conf
upstream emqx_servers {
  server 192.168.137.101:1883;
  server 192.168.137.102:1883;
  server 192.168.137.103:1883;
}

server {
  listen                1883;
  proxy_pass            emqx_servers;

  # 启用此项时,对应后端监听器也需要启用 proxy_protocol
  proxy_protocol        on;
  proxy_connect_timeout 10s;
  # 默认心跳时间为 10 分钟
  proxy_timeout         60s;
  proxy_buffer_size     3M;
  tcp_nodelay           on;
}

server {
  listen 8883 ssl;

  ssl_session_cache     shared:TCPSSL:10m;
  ssl_session_timeout   10m;
  ssl_certificate       /usr/local/nginx/certs/emqx.pem;
  ssl_certificate_key   /usr/local/nginx/certs/emqx.key;
  ssl_verify_depth      2;
  ssl_protocols         TLSv1 TLSv1.1 TLSv1.2;
  ssl_ciphers           HIGH:!aNULL:!MD5;

  # 添加 CA 证书及开启验证客户端证书参数即可启用双向认证
  # ssl_client_certificate /usr/local/NGINX/certs/ca.pem;
  # ssl_verify_client on;
  # ssl_verify_depth 1;

  proxy_pass            emqx_servers;

  # 启用此项时,对应后端监听器也需要启用 proxy_protocol
  proxy_protocol        on;
  proxy_connect_timeout 10s;
  # 默认心跳时间为 10 分钟
  proxy_timeout         1800s;
  proxy_buffer_size     3M;
  tcp_nodelay           on;
}
4. WebSocket协议配置文件 /usr/local/nginx/conf.d/websocket.conf
upstream emqx_websocket_servers {
  server 192.168.137.101:8083;
  server 192.168.137.102:8083;
  server 192.168.137.103:8083;
}

server {
  listen                1080;
  server_name           mqtt.example.com;

  location /mqtt {
      proxy_pass            http://emqx_websocket_servers;

      proxy_http_version    1.1;
      proxy_set_header      Upgrade $http_upgrade;
      proxy_set_header      Connection "Upgrade";

      # 禁用缓存
      proxy_buffering       off;

      proxy_connect_timeout 10s;
      # WebSocket 连接有效时间
      # 在该时间内没有数据交互的话 WebSocket 连接会自动断开,默认为 60s
      proxy_send_timeout    3600s;
      proxy_read_timeout    3600s;

      # 反向代理真实 IP
      proxy_set_header      Host $host;
      proxy_set_header      X-Real-IP $remote_addr;
      proxy_set_header      REMOTE-HOST $remote_addr;
      proxy_set_header      X-Forwarded-For $proxy_add_x_forwarded_for;
  }
}

server {
  listen 1443           ssl;
  server_name           mqtt.example.com;

  ssl_session_cache     shared:SSL:10m;
  ssl_session_timeout   10m;
  ssl_certificate       /usr/local/nginx/certs/emqx.pem;
  ssl_certificate_key   /usr/local/nginx/certs/emqx.key;
  ssl_protocols         TLSv1 TLSv1.1 TLSv1.2;
  ssl_ciphers           HIGH:!aNULL:!MD5;

  # 添加 CA 证书及开启验证客户端证书参数即可启用双向认证
  # ssl_client_certificate /usr/local/NGINX/certs/ca.pem;
  # ssl_verify_client on;

  location /mqtt {
      proxy_pass            http://emqx_websocket_servers;

      proxy_http_version    1.1;
      proxy_set_header      Upgrade $http_upgrade;
      proxy_set_header      Connection "Upgrade";

      # 禁用缓存
      proxy_buffering       off;

      proxy_connect_timeout 10s;
      # WebSocket 连接有效时间
      # 在该时间内没有数据交互的话 WebSocket 连接会自动断开,默认为 60s
      proxy_send_timeout    3600s;
      proxy_read_timeout    3600s;

      # 反向代理真实 IP
      proxy_set_header      Host $host;
      proxy_set_header      X-Real-IP $remote_addr;
      proxy_set_header      REMOTE-HOST $remote_addr;
      proxy_set_header      X-Forwarded-For $proxy_add_x_forwarded_for;
  }

}
5. 重启服务
# 检测配置文件是否正常
/usr/local/nginx/sbin/nginx -t

# 重启Nginx
service nginx restart
4. 验证负载均衡
-
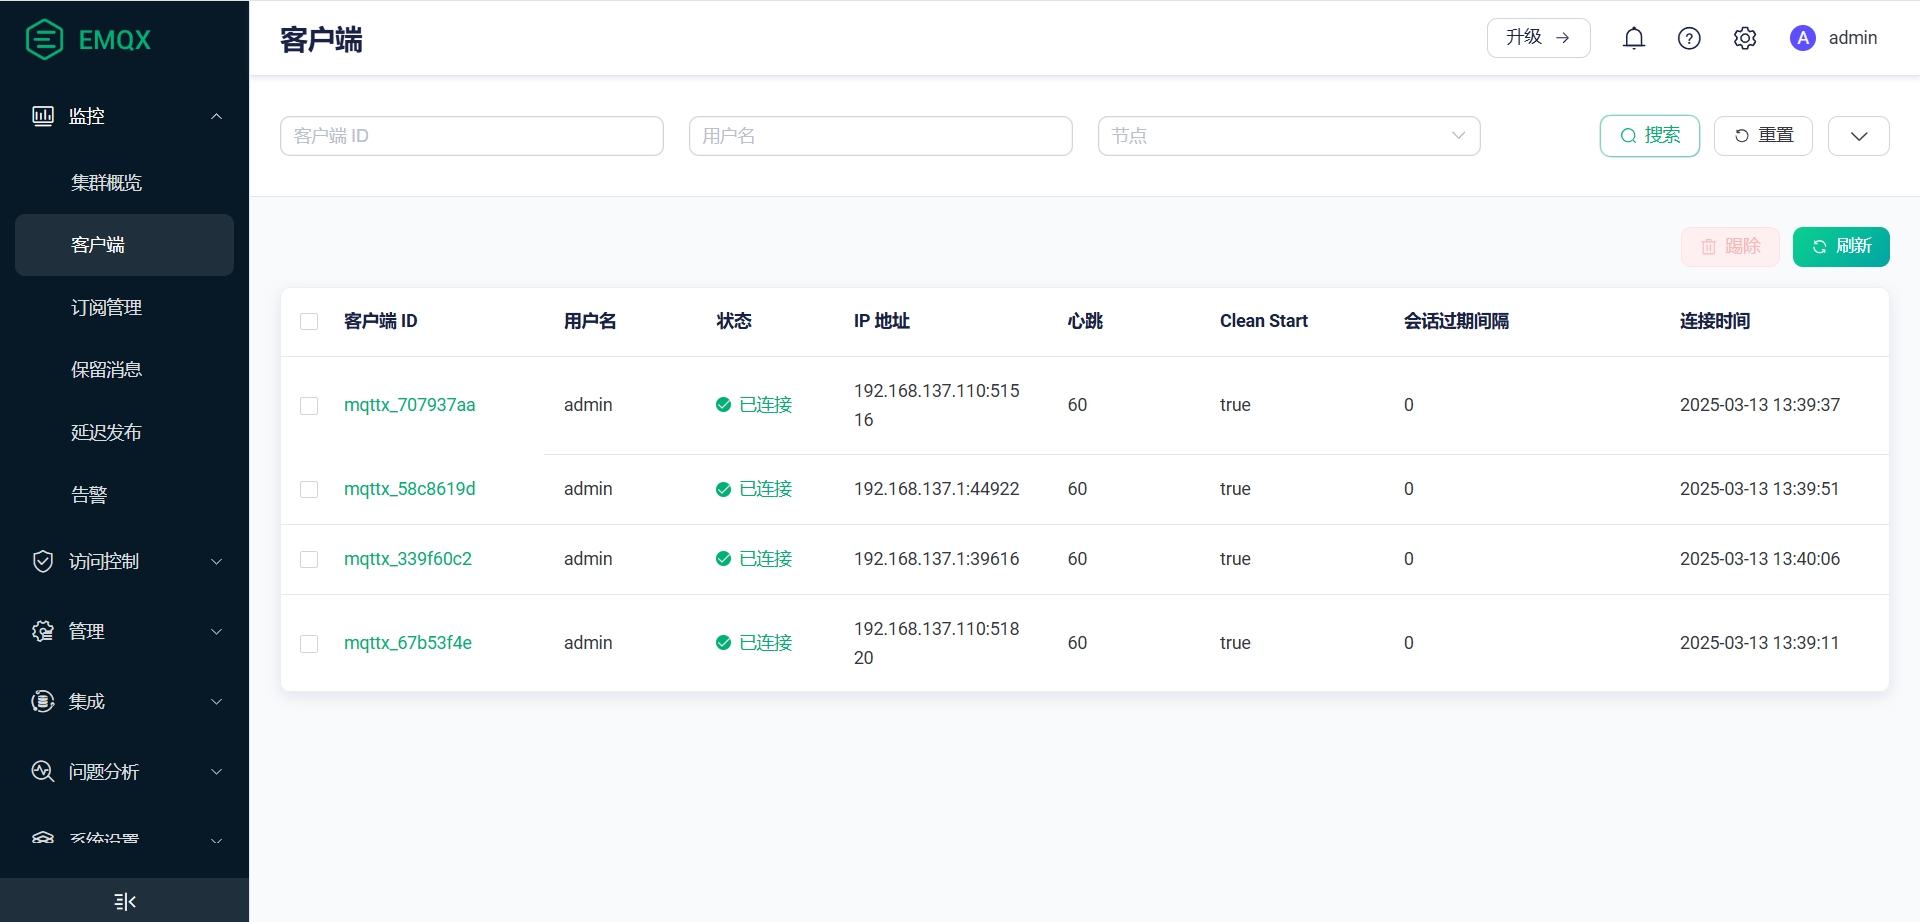
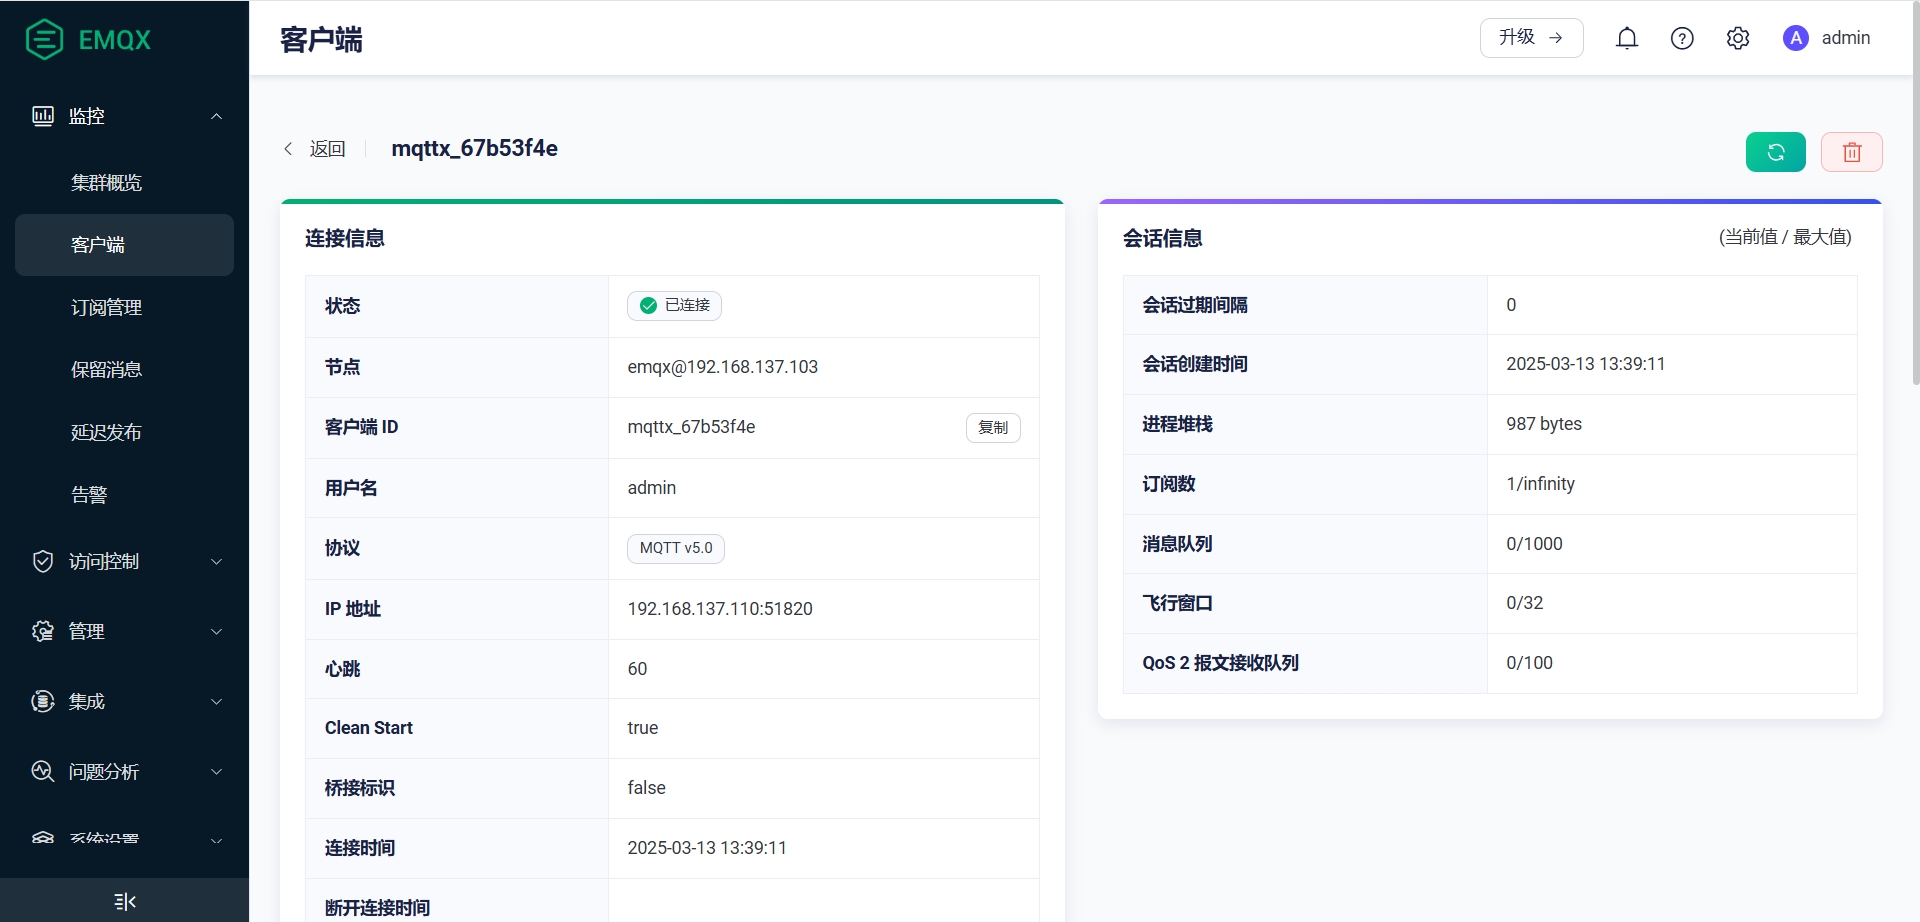
使用MQTTX启动四个客户端,分别连接到 Nginx 1883 8883 1080 1443端口
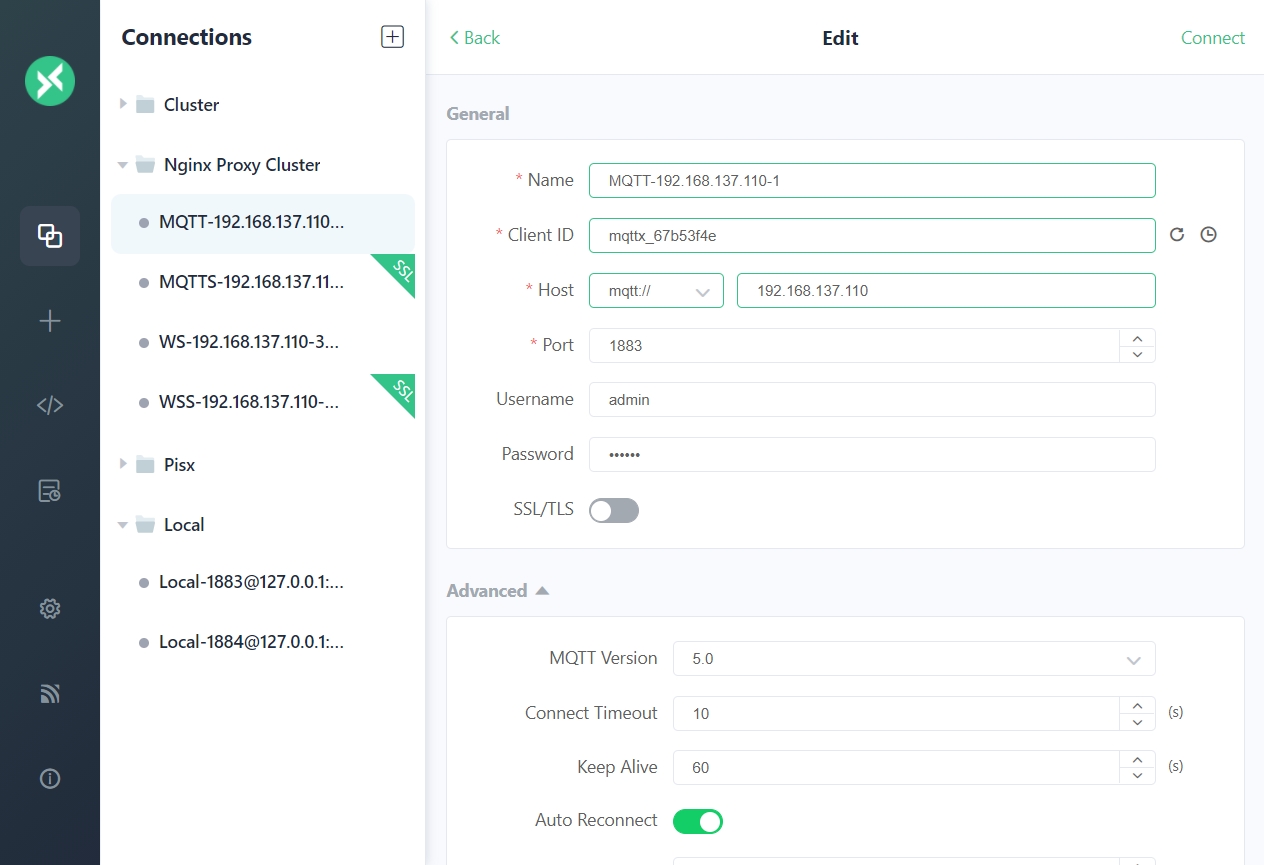

-
可以看到,四个连接分别路由到了 101 102 103


-
订阅和Topic情况如下

-
发送一条测试消息,四个客户端都正常收到

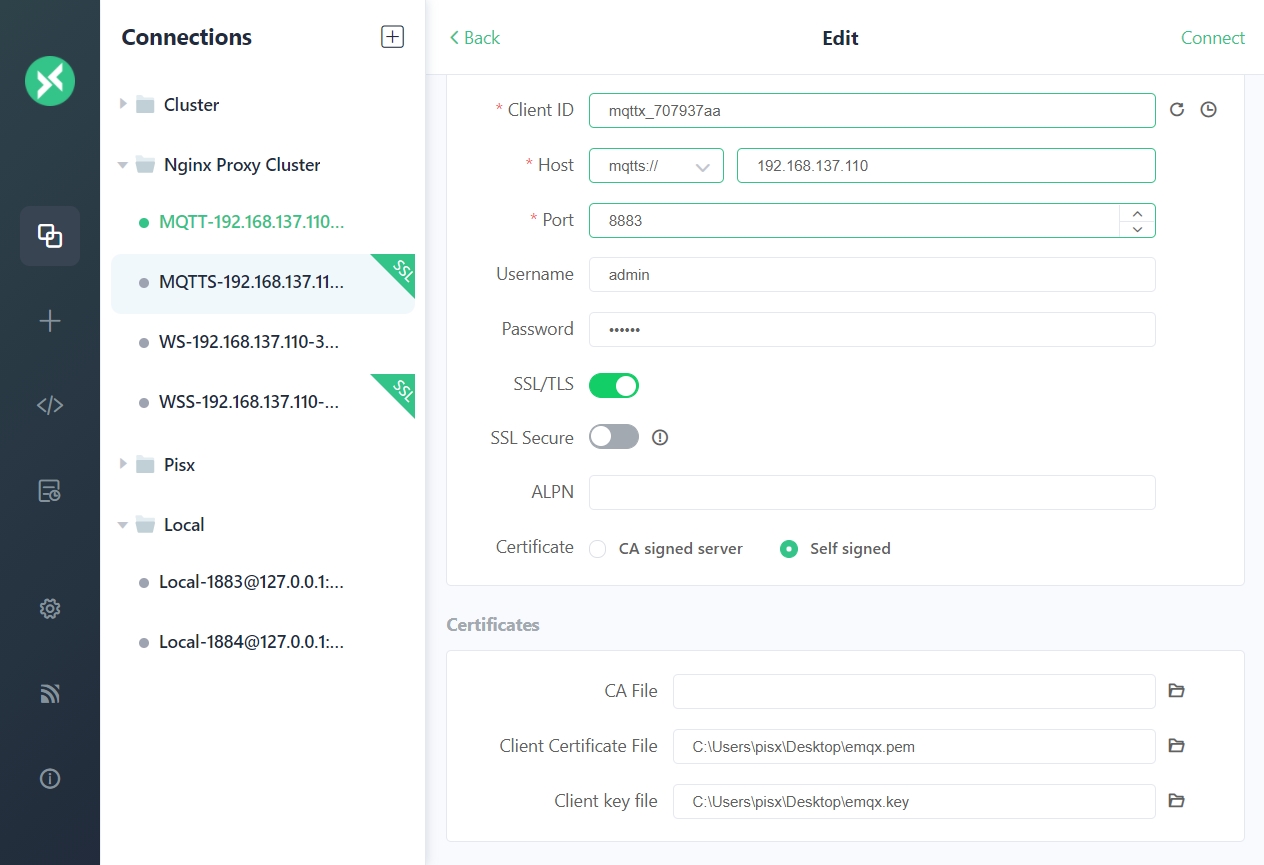
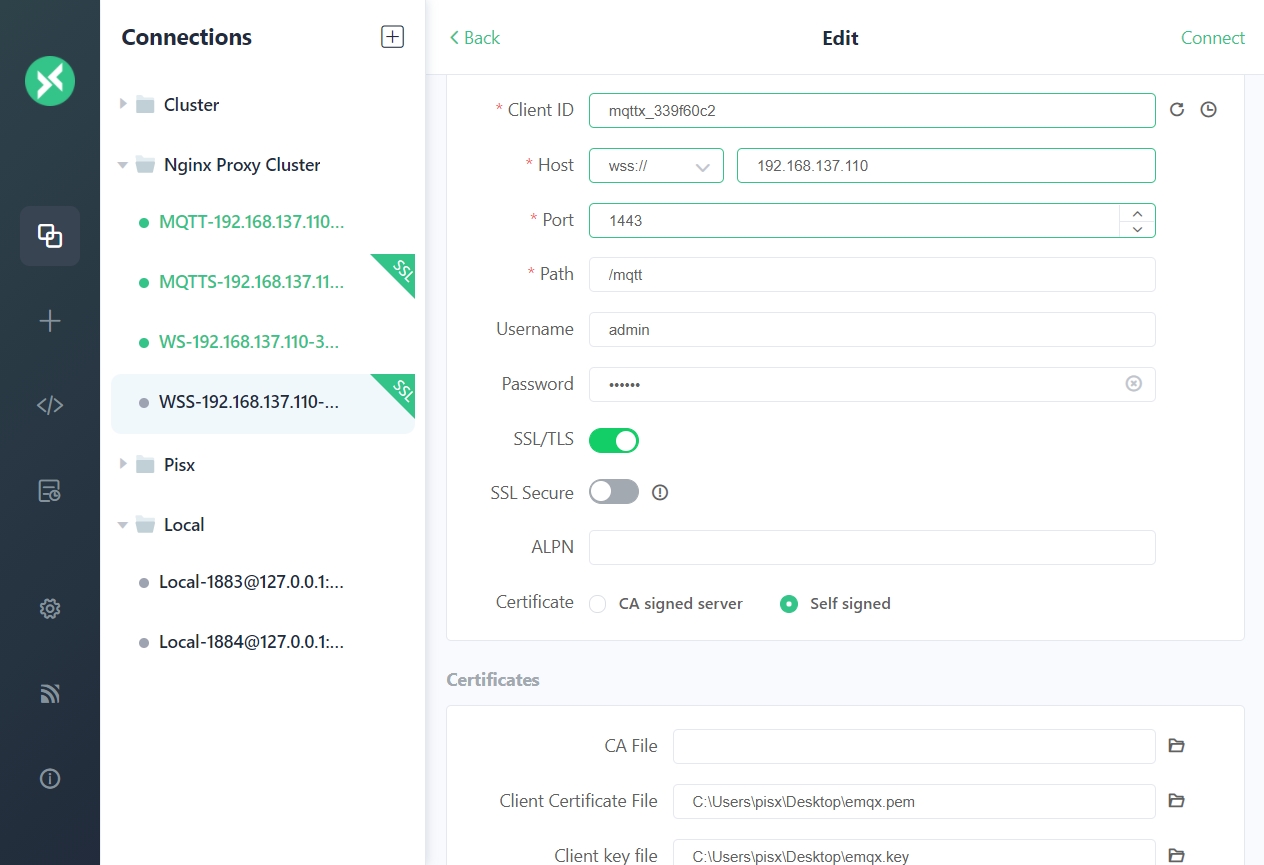
注意 由于使用的是自签名证书,使用 mqtts wss连接时需要单独配置证书信息
八、HAProxy负载均衡
1. 环境准备
1. 安装Lua运行环境
# 下载
curl https://www.lua.org/ftp/lua-5.4.7.tar.gz -o lua-5.4.7.tar.gz

# 解压
tar -zxvf lua-5.4.7.tar.gz -C /usr/local/

cd /usr/local/lua-5.4.7

# 编译
make linux test

# 测试
src/lua -v
2. 修改系统配置
- 修改进程句柄限制
vim /etc/security/limits.conf

# 打开 /etc/security/limits.conf 文件,最后面追加:

*               soft    nofile  120000
*               hard    nofile  120000
*               soft    nproc   120000
*               hard    nproc   120000
- 修改系统配置文件
vim /etc/sysctl.conf
# 打开 /etc/sysctl.conf 文件,最后面追加:
net.ipv4.tcp_tw_reuse = 1 # 表示开启重用.允许将TIME-WAIT sockets重新用于新的TCP连接,默认为0,表示关闭;
net.ipv4.tcp_tw_recycle = 1 # 表示开启TCP连接中TIME-WAIT sockets的快速回收,默认为0,表示关闭.
net.ipv4.tcp_syncookies=1 # 表示开启SYN Cookies.当出现SYN等待队列溢出时,启用cookies来处理,可防范少量SYN攻击,默认为0,表示关闭;
net.ipv4.conf.all.rp_filter = 1 # 过滤反向路由不通的数据包
net.ipv4.ip_local_port_range = 1024 65535 # 表示用于向外连接的端口范围.缺省情况下很小:32768到61000,改为1024到65000.
net.ipv4.tcp_max_syn_backlog = 50000 # 记录的那些尚未收到客户端确认信息的连接请求的最大值,可以容纳更多等待连接的网络连接数. 对于有128M内存的系统而言,缺省值是1024,小内存的系统则是128.
net.ipv4.tcp_max_tw_buckets = 400000 #timewait的数量,默认是180000.
net.ipv4.tcp_max_orphans = 60000 # 系统中最多有多少个TCP套接字不被关联到任何一个用户文件句柄上.如果超过这个数字,孤儿连接将即刻被复位并打印出警告信息.这个限制仅仅是为了防止简单的DoS攻击,不能过分依靠它或者人为地减小这个值,更应该增加这个值(如果增加了内存之后).
net.ipv4.tcp_synack_retries = 3 # 为了打开对端的连接,内核需要发送一个SYN并附带一个回应前面一个SYN的ACK.也就是所谓三次握手中的第二次握手.这个设置决定了内核放弃连接之前发送SYN+ACK包的数量.
net.core.somaxconn = 50000 # web应用中listen函数的backlog默认会给我们内核参数的net.core.somaxconn限制到128
net.core.rmem_max = 16777216 # 系统套接字缓冲区(读), 包含三个整数值,分别是:min,default,max
net.core.wmem_max = 16777216 # 系统套接字缓冲区(写), 包含三个整数值,分别是:min,default,max
net.ipv4.tcp_rmem = 4096 87380 16777216 # TCP接收/发送缓冲区(读)
net.ipv4.tcp_wmem = 4096 65536 16777216 # TCP接收/发送缓冲区(写)
net.ipv4.tcp_no_metrics_save = 1 # 使metrics不保存每个单��独的数据包
net.ipv4.tcp_moderate_rcvbuf = 1 # 表示打开了TCP内存自动调整功能
net.core.netdev_max_backlog = 50000 # 每个网络接口接收数据包的速率比内核处理这些包的速率快时,允许送到队列的数据包的最大数目.
fs.file-max=2048000 # 表示系统级别的能够打开的文件句柄①的数量.是对整个系统的限制,并不是针对用户的.
-
执行
sysctl -p命令操作来使我们所做的变更生效. -
开放端口
firewall-cmd --zone=public --add-port=8888/tcp --permanent

firewall-cmd --zone=public --add-port=1883/tcp --permanent
firewall-cmd --zone=public --add-port=8883/tcp --permanent

firewall-cmd --zone=public --add-port=1080/tcp --permanent
firewall-cmd --zone=public --add-port=1443/tcp --permanent

firewall-cmd --reload

firewall-cmd --list-port
| 端口 | 描述 |
|---|---|
| 8888 | HAProxy 监控端口 |
| 1883 | 反向代理 MQTT端口 |
| 8883 | 反向代理 MQTT SSL端口 |
| 1080 | 反向代理 MQTT WebSocket端口 |
| 1443 | 反向代理 MQTT WebSocket SSL端口 |
2. 下载安装
1. 下载解压
# 下载解压
curl https://www.haproxy.org/download/3.1/src/haproxy-3.1.5.tar.gz -o haproxy-3.1.5.tar.gz
tar -zxvf haproxy-3.1.5.tar.gz

cd haproxy-3.1.5

# 查看安装方法
less INSTALL

less Makefile
2. 编译安装
make clean

# 编译
make ARCH=x86_64 TARGET=linux-glibc USE_PCRE=1 USE_OPENSSL=1 USE_ZLIB=1 USE_SYSTEMD=1 USE_CPU_AFFINITY=1 USE_LUA=1 LUA_INC=/usr/local/lua-5.4.7/src/ LUA_LIB=/usr/local/lua-5.4.7/src/ PREFIX=/usr/local/haproxy

# 安装
make install PREFIX=/usr/local/haproxy

# 查看目录结构
tree /usr/local/haproxy

# 测试
/usr/local/haproxy/sbin/haproxy -V

# 创建配置目录 日志目录
mkdir -p /usr/local/haproxy/{conf,conf.d,logs,certs}

# 将Nginx证书 key合成一个
cat /usr/local/nginx/certs/emqx.pem /usr/local/nginx/certs/emqx.key > /usr/local/haproxy/certs/server.pem
3. 配置HAProxy
1. 主配置文件
cat > /usr/local/haproxy/conf/haproxy.cfg << 'EOF'
global
  log 127.0.0.1 local3 info
  daemon
  maxconn 10000  # FD limit = maxconn * 2 + 18

defaults
  log global
  mode tcp
  option tcplog
  #option dontlognull
  timeout connect 10000
  # timeout > mqtt's keepalive * 1.2
  timeout client 240s
  timeout server 240s
  maxconn 20000

frontend stats
  mode http
  bind *:8888               # 监控访问端口
  stats enable
  stats uri /stats          # 监控访问路径
  stats hide-version        # 隐藏版本号
  stats refresh 10s
  stats realm HAProxy Manager
  stats auth  admin:123456  # 设置管理员帐号和密码
  log 127.0.0.1 local3 err  # [err warning info debug]

EOF
2. mqtt协议配置
cat > /usr/local/haproxy/conf.d/mqtt.cfg << 'EOF'
backend mqtt_backend
  mode tcp
  # 创建粘性会话表
  stick-table type string len 32 size 100k expire 30m

  # 使用客户端 ID 作为键
  stick on req.payload(0,0), mqtt_field_value(connect,client_identifier)

  # 增加 send-proxy 会把真实带给 EMQX,对应后端监听器需要启用 proxy_protocol
  # server emqx1 emqx1-cluster.emqx.io:1883 check send-proxy-v2-ssl-cn
  server emqx1 192.168.137.101:1883 check send-proxy-v2-ssl-cn
  server emqx2 192.168.137.102:1883 check send-proxy-v2-ssl-cn
  server emqx3 192.168.137.103:1883 check send-proxy-v2-ssl-cn

frontend mqtt_frontend
  bind *:1883
  mode tcp
  # 等待缓冲区填满,以便解析 MQTT 报文
  tcp-request inspect-delay 10s
  # 拒绝非 MQTT 连接
  tcp-request content reject unless { req.payload(0,0), mqtt_is_valid }
  default_backend mqtt_backend

backend mqtt_tls_backend
  mode tcp
  balance roundrobin

 # 增加 send-proxy 会把真实 IP 带给 EMQX,对应后端监听器需要启用 proxy_protocol
  server emqx1 192.168.137.101:1883 check-send-proxy send-proxy-v2-ssl-cn
  server emqx2 192.168.137.102:1883 check-send-proxy send-proxy-v2-ssl-cn
  server emqx3 192.168.137.103:1883 check-send-proxy send-proxy-v2-ssl-cn

frontend mqtt_tls_frontend
  bind *:8883 ssl crt /usr/local/haproxy/certs/server.pem
  # 双向认证
  # bind *:8883 ssl ca-file /etc/haproxy/certs/cacert.pem crt /etc/haproxy/certs/server.pem verify required
  mode tcp
  default_backend mqtt_tls_backend

EOF
3. websocket协议配置
cat > /usr/local/haproxy/conf.d/websocket.cfg << 'EOF'
backend mqtt_ws_backend
  mode tcp
  balance roundrobin
  server emqx1 192.168.137.101:8083 check
  server emqx2 192.168.137.102:8083 check
  server emqx3 192.168.137.103:8083 check

frontend mqtt_ws_frontend
  bind *:1080
  mode tcp
  default_backend mqtt_ws_backend

backend mqtt_ws_tls_backend
  mode tcp
  balance roundrobin
  server emqx1 192.168.137.101:8083 check
  server emqx2 192.168.137.102:8083 check
  server emqx3 192.168.137.103:8083 check

frontend mqtt_ws_tls_frontend
  bind *:1443 ssl crt /usr/local/haproxy/certs/server.pem
  mode tcp
  default_backend mqtt_ws_tls_backend

EOF
4. 注册运行
1. 将HAProxy注册为服务
cat > /usr/lib/systemd/system/haproxy.service << 'EOF'
[Unit]
Description=HAProxy Load Balancer
After=syslog.target network.target

[Service]
# 支持多配置文件读取,类似于从侧面是实现配置文件的include功能。
ExecStartPre=/usr/local/haproxy/sbin/haproxy  -f /usr/local/haproxy/conf/haproxy.cfg -f /usr/local/haproxy/conf.d -c -q
ExecStart=/usr/local/haproxy/sbin/haproxy -Ws -f /usr/local/haproxy/conf/haproxy.cfg -f /usr/local/haproxy/conf.d -p /usr/local/haproxy/logs/haproxy.pid
ExecReload=/bin/kill -USR2 $MAINPID
LimitNOFILE=100000

[Install]
WantedBy=multi-user.target

EOF
2. 运行
service haproxy start

service haproxy stop

service haproxy status

systemctl enable haproxy
3. 访问
浏览器打开监控面板
- 账号密码 admin / 123456
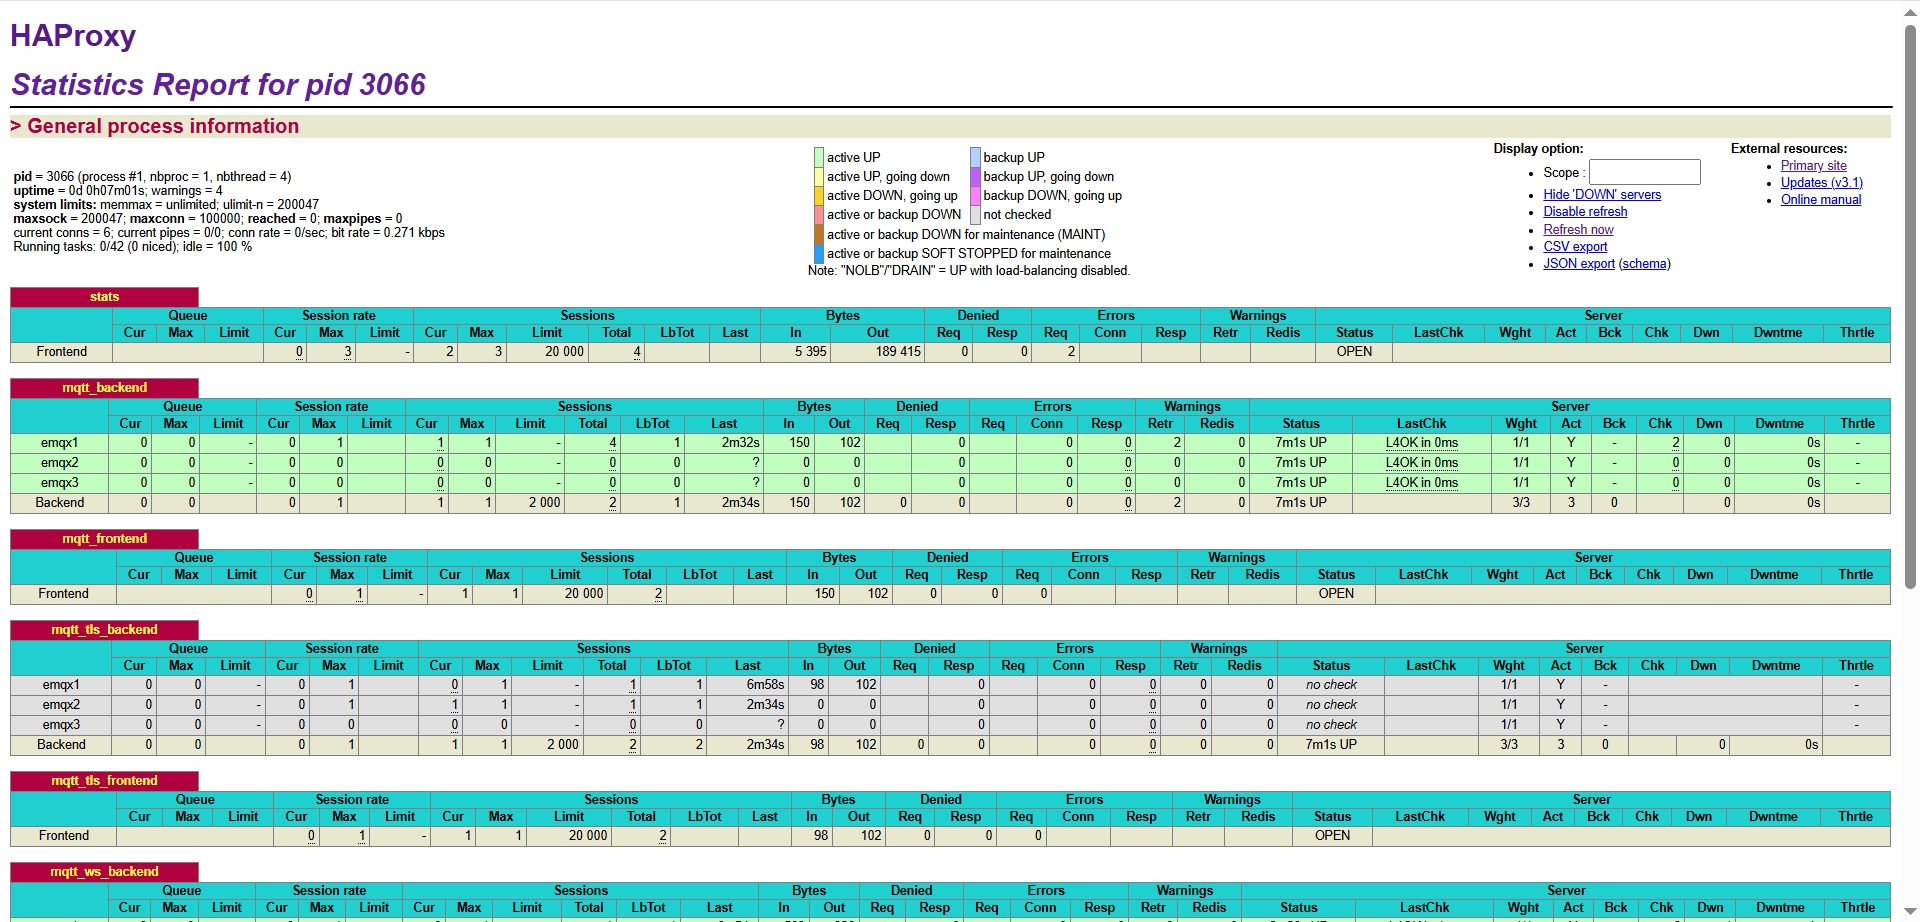
九、集群网关对比
经过测试,两种网关都能实现EMQX集群节点断开后的自动重连;但是对于已订阅的Topic都不会重新订阅,需要在重连后重新订阅Topic,否则客户端无法收到消息。
Topic订阅属于客户端自身的行为,需要在客户端实现重连之后重新订阅Topic。
相对来说:
- Nginx 拥有更多的用户,更完善的社区文档,上手门槛更低,但是对于MQTT的支持较弱。
- HAProxy 在性能以及高可用上更胜一筹,对MQTT的支持也更好,但是相对用户量少,门槛更高,运维成本高。
十、其他问题
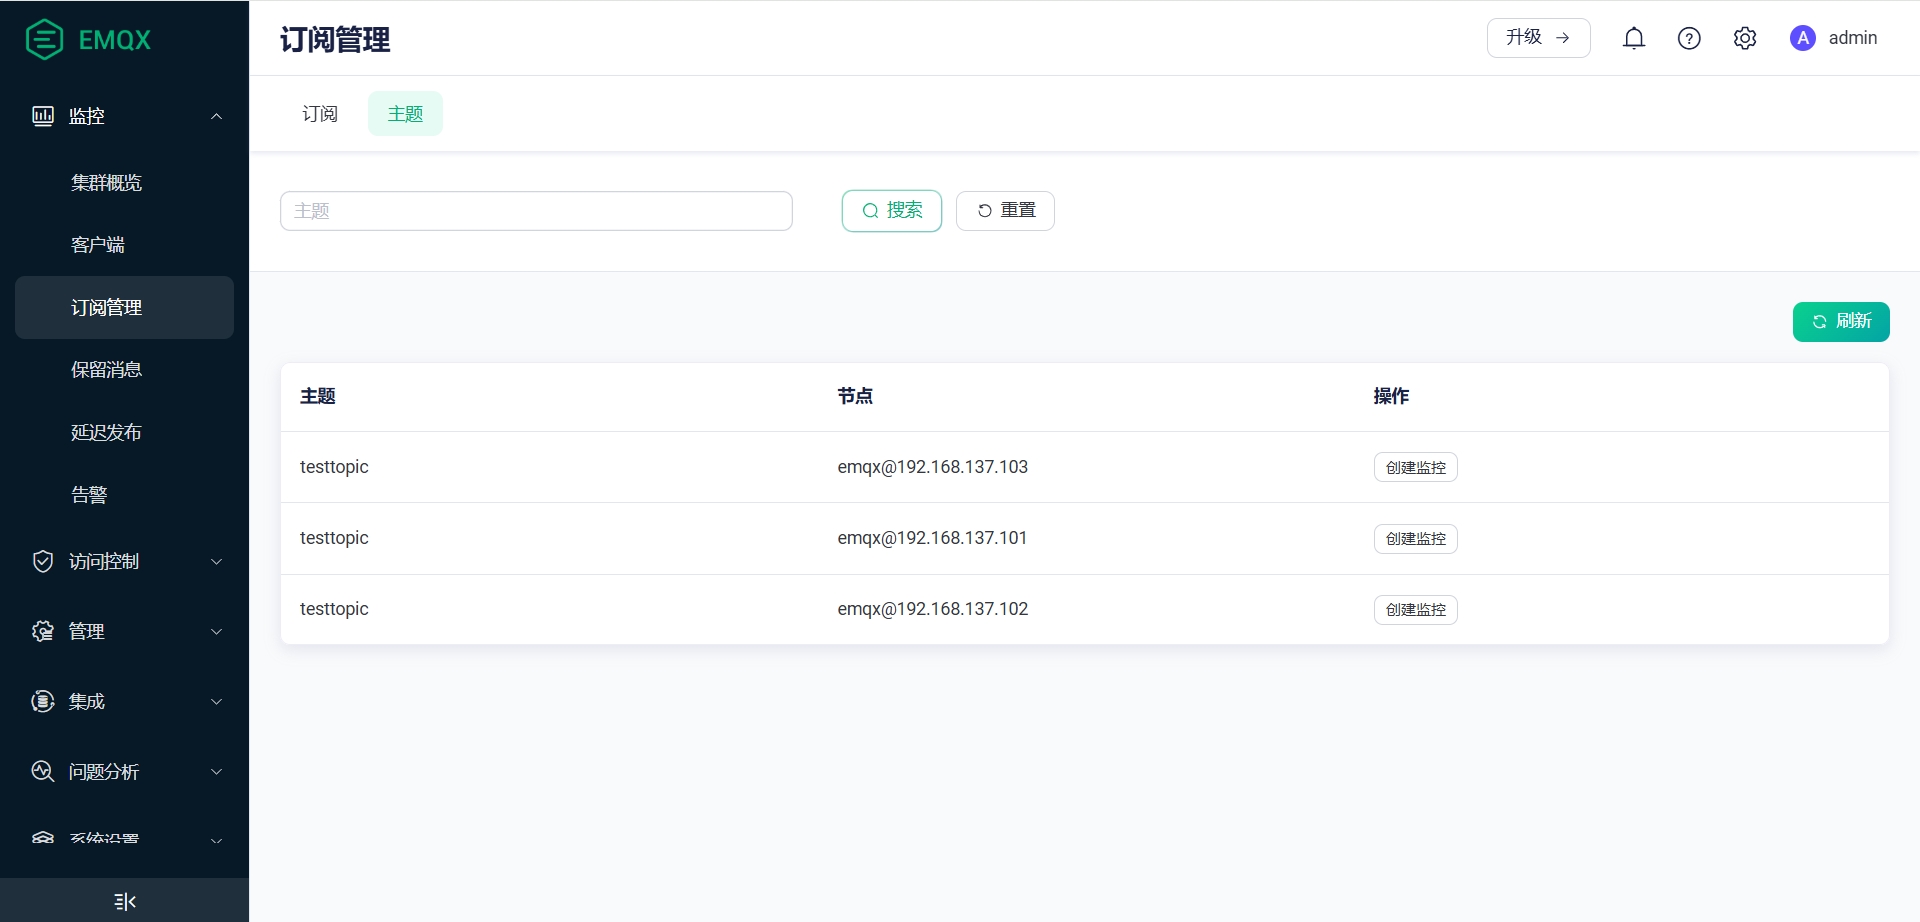
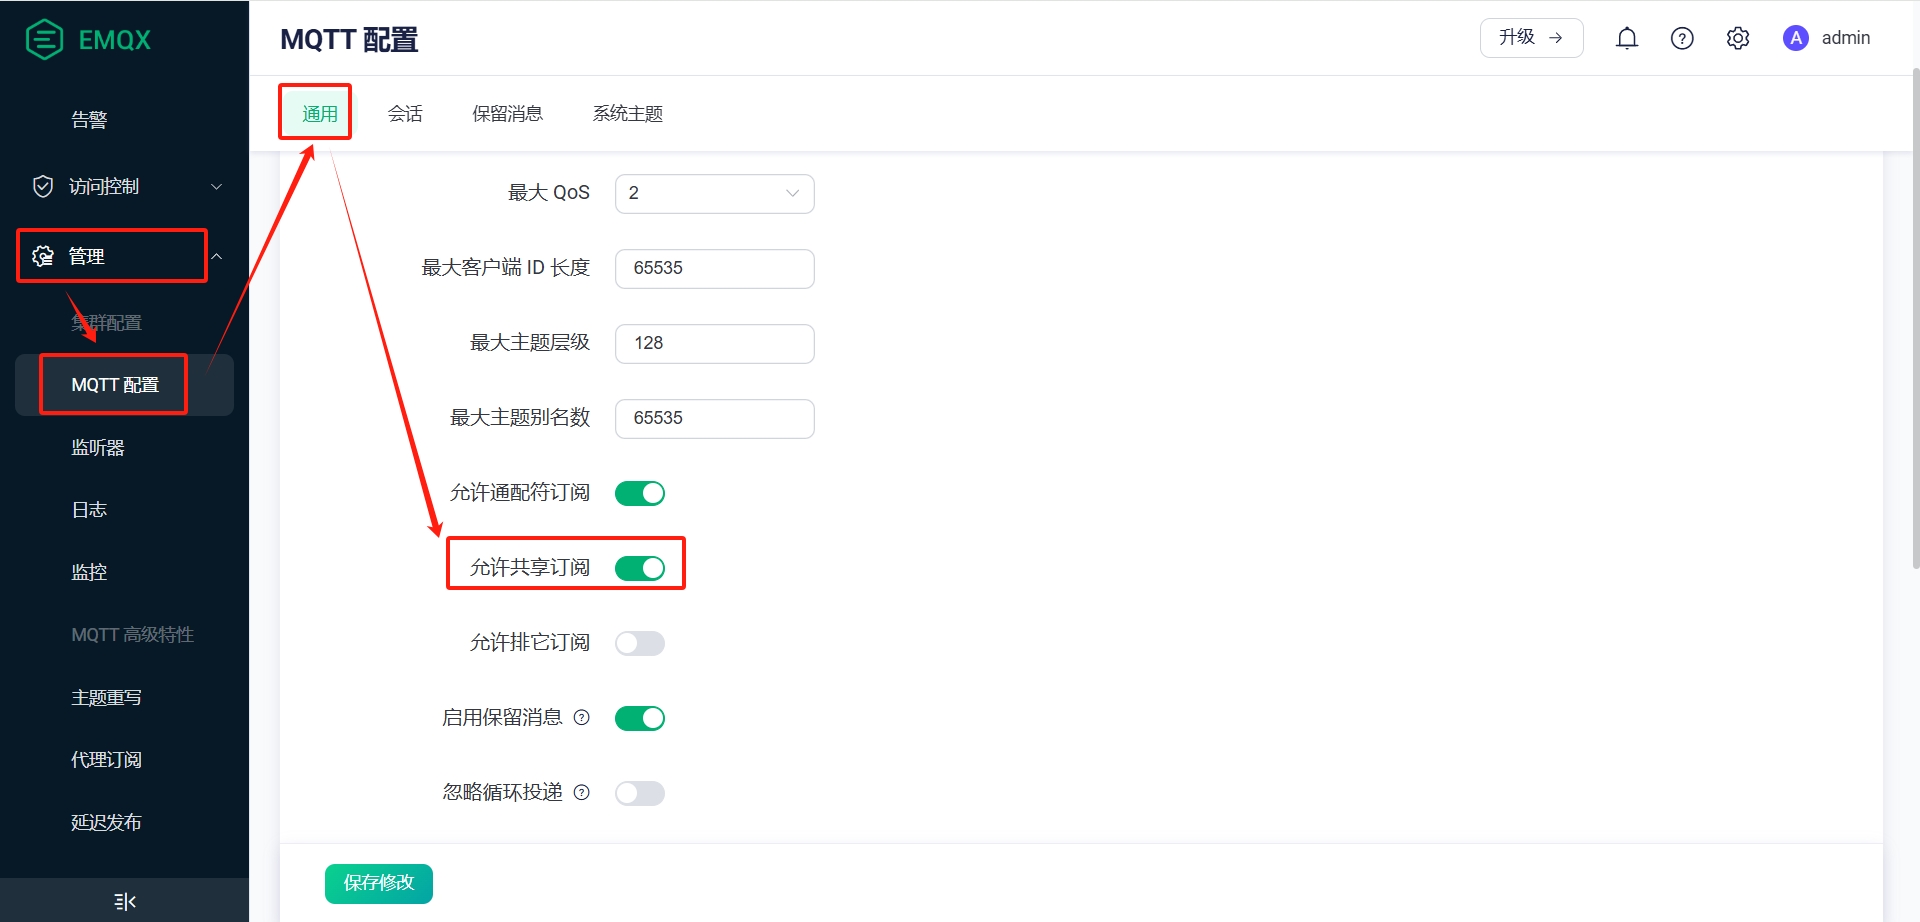
1. 共享订阅
在不使用共享订阅时,每个客户端都会收到全量的消息,造成消息的重复消费,同时也会导致客户端消息处理能力的下降。
MQTT在5.0之后新增了共享订阅特性,很好的避免了这个问题,使用共享订阅,可以实现在扩展客户端的同时,充分利用每个客户端的消息处理能力,同时也避免了消息的重复消费
共享订阅在EMQX中时默认开启的,只需要在订阅topic时添加对应的前缀即可实现,Web配置位置如下图所示
| 示例 | 前缀 | 组别 | topic |
|---|---|---|---|
$share/{ShareName}/{topic-name} | $share | {ShareName} | {topic-name} |
$share/pisx/A2-F1/电压表 | $share | lux | A2-F1/电压表 |
$share/yunyi/01_混配/1#罐流量计 | $share | yunyi | 01_混配/1#罐流量计 |
$queue/01_混配/1#罐流量计 | $queue | - | 01_混配/1#罐流量计 |
Note: 除了使用$share/<group-name> 这种共享订阅方式之外,EMQX还提供了不带组别的共享订阅 $queue,详情见不带组别的共享订阅
-
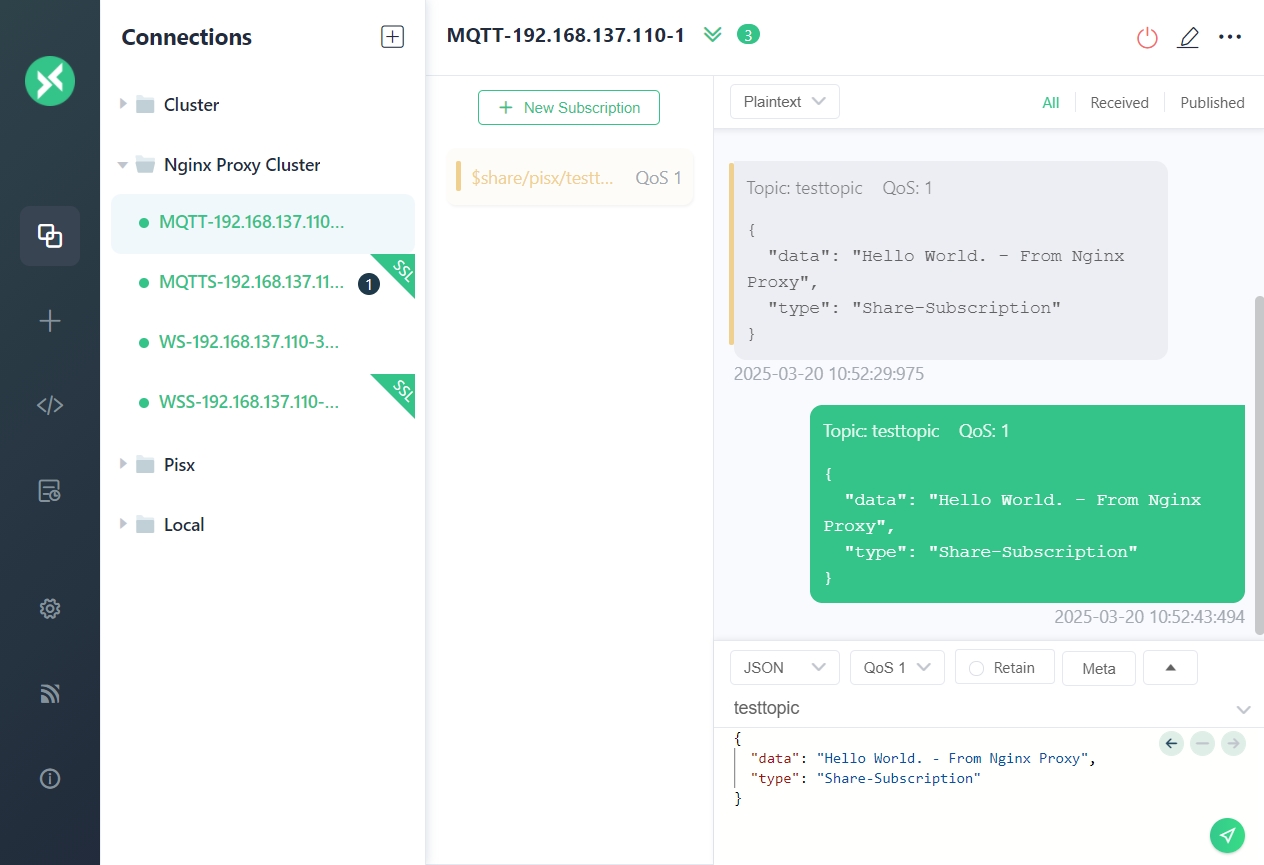
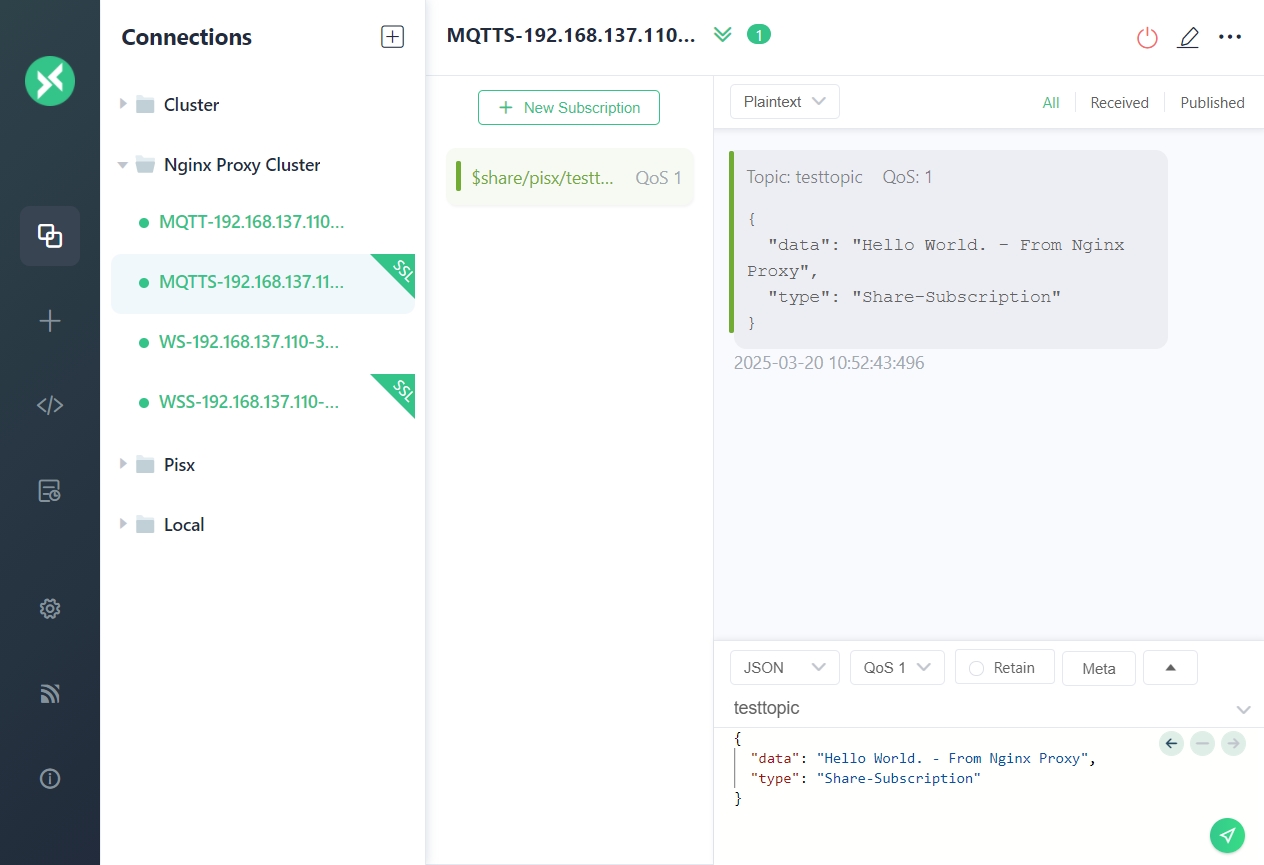
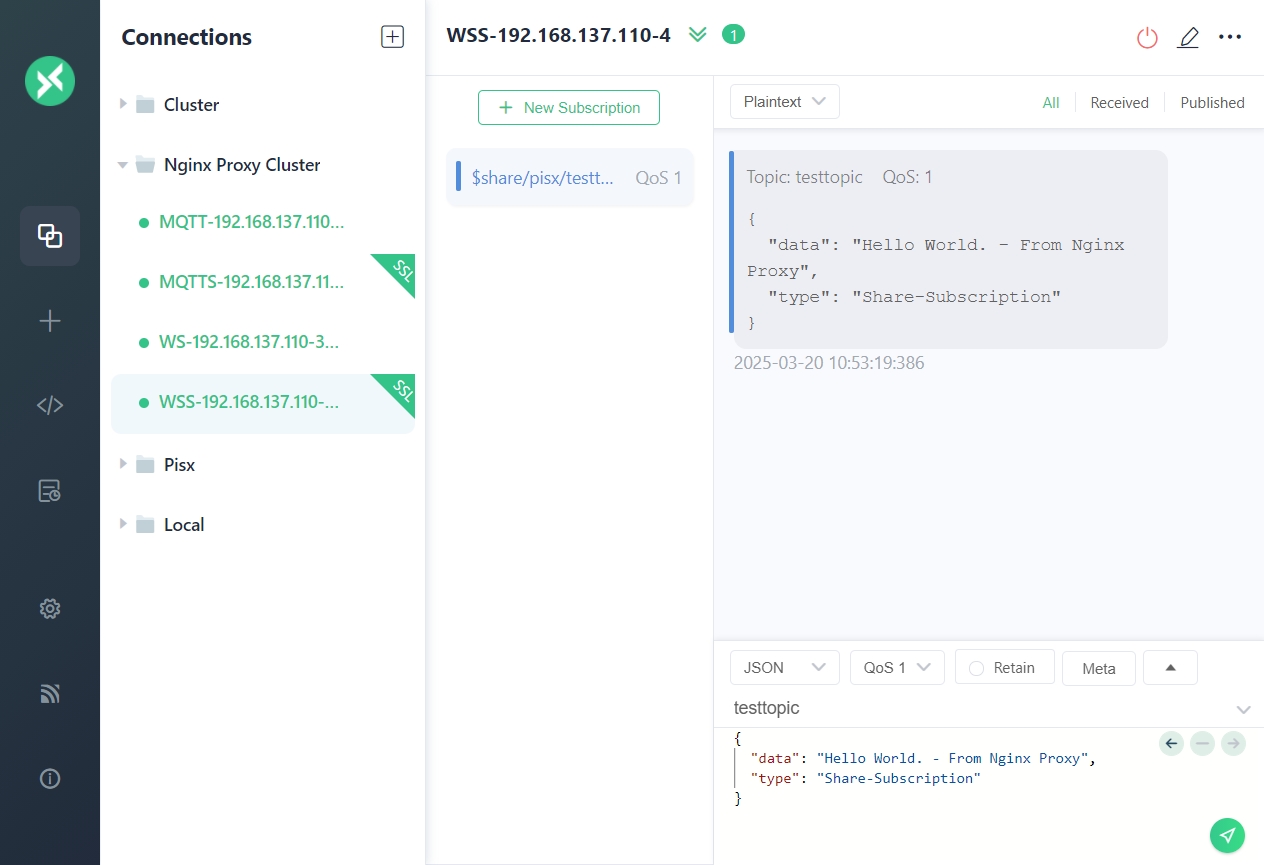
四个客户端连接到集群,分别采用相同的共享订阅前缀订阅 topic
testtopic,带前缀的topic地址为$share/pisx/testtopic -
其中一个客户端向 topic
testtopic发送消息,可以看到只有一个客户端收到消息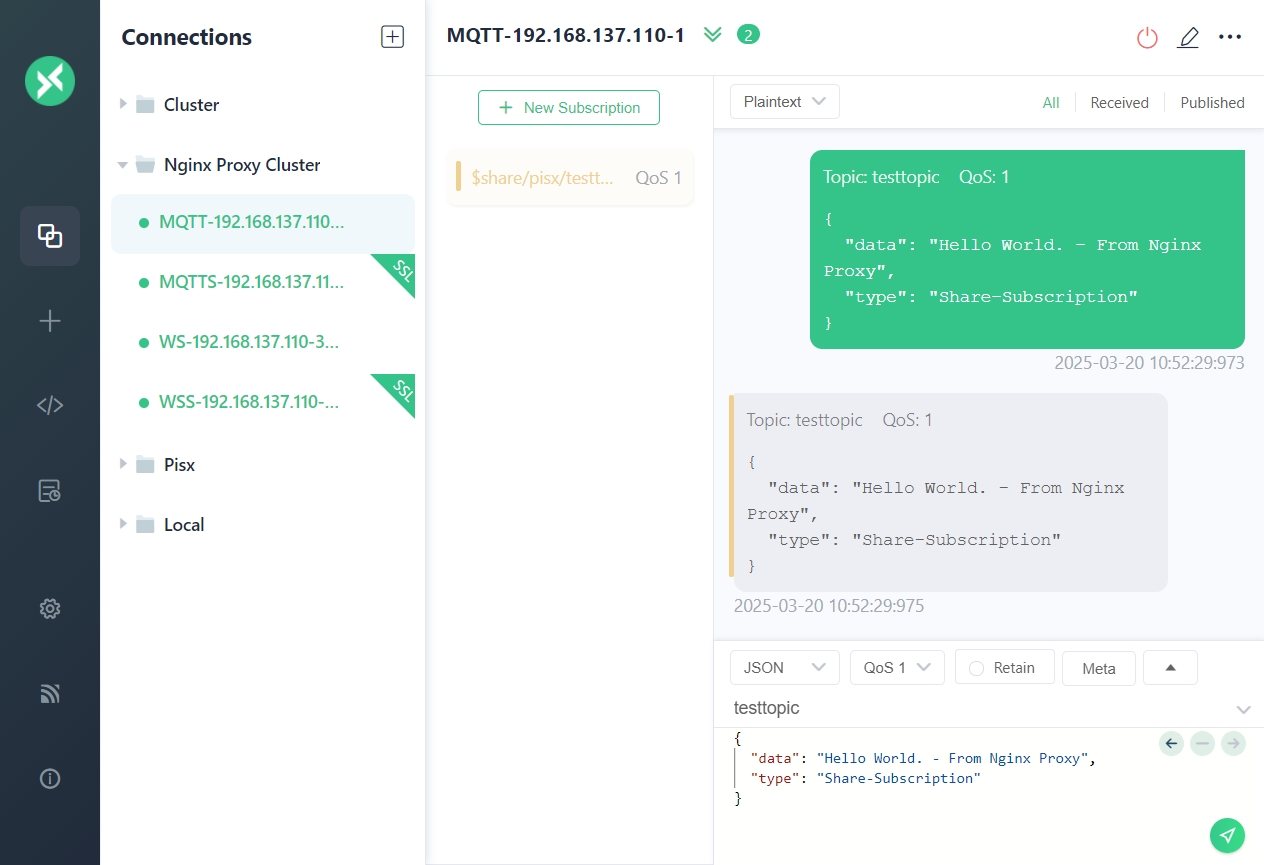
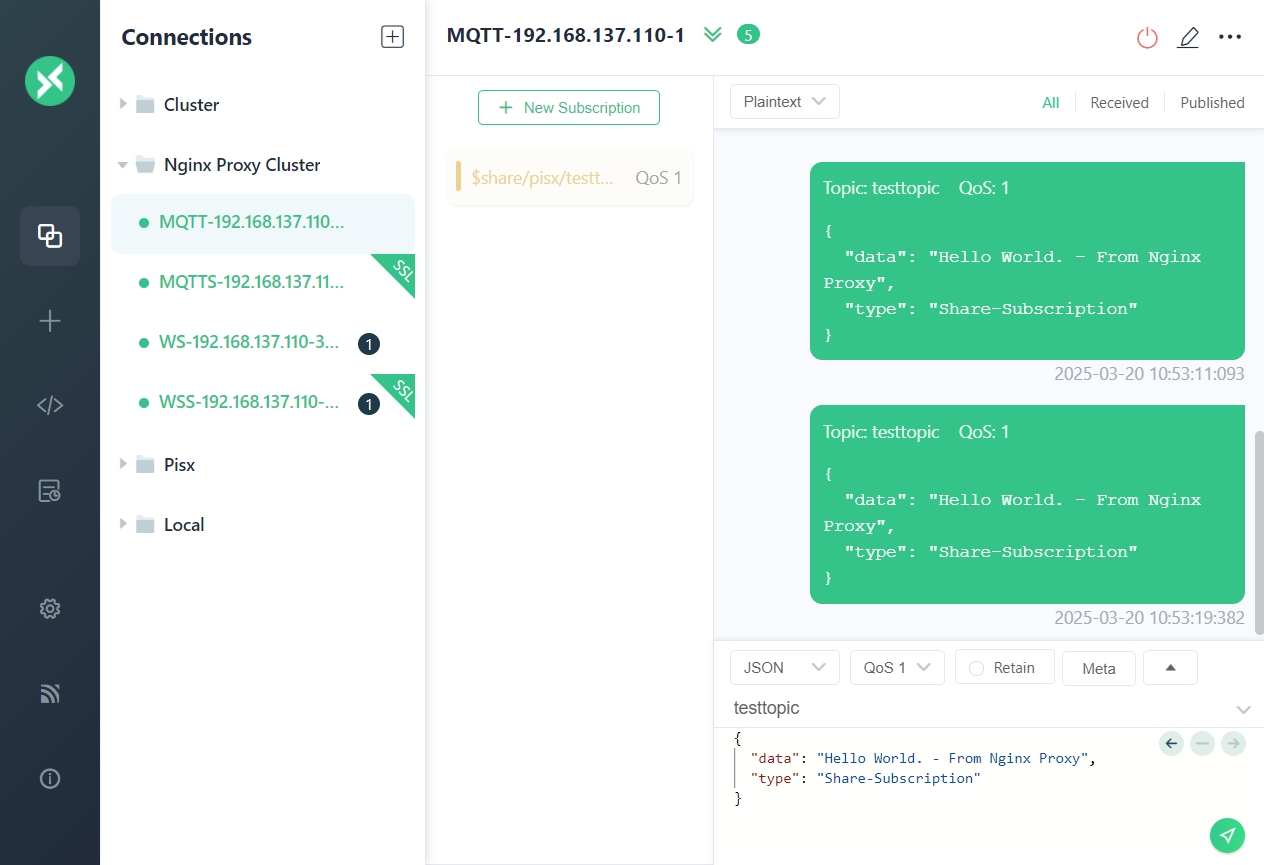
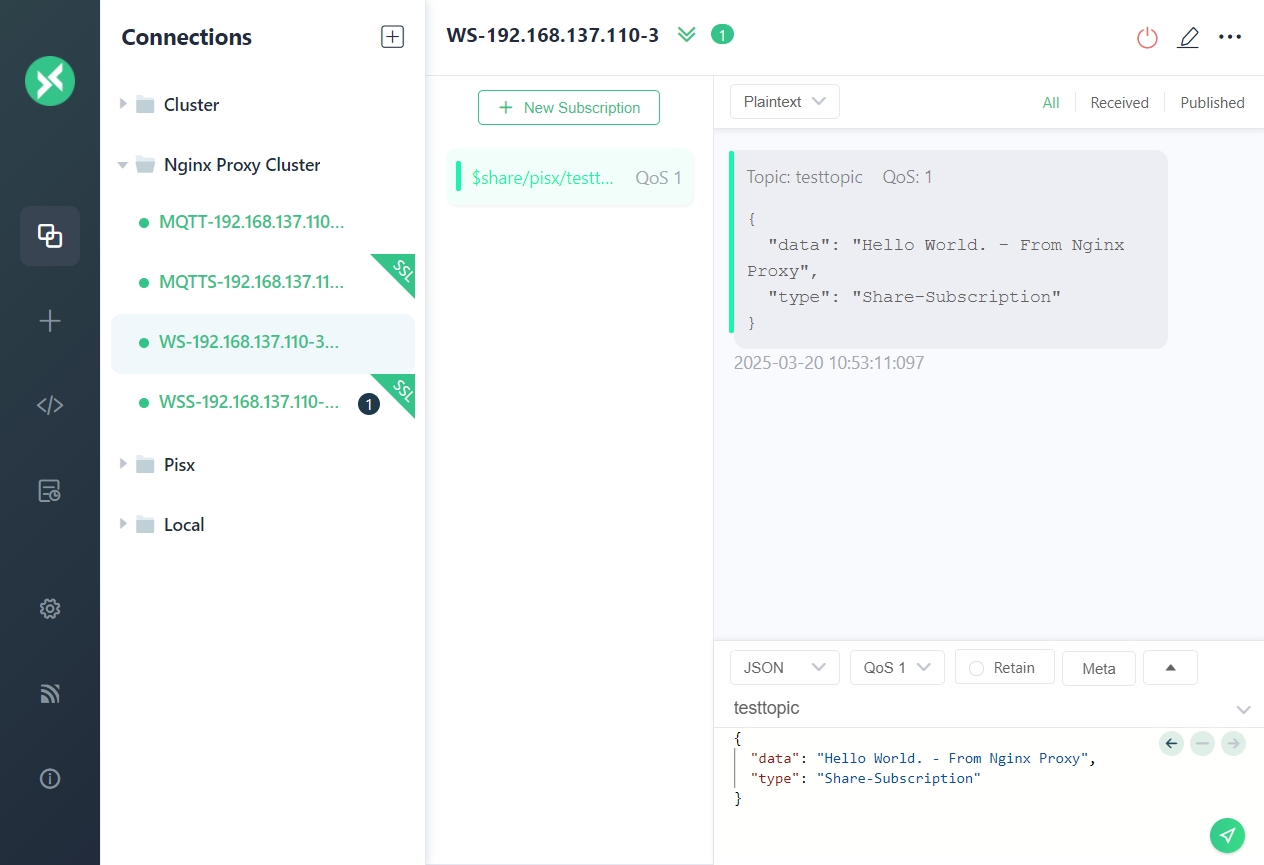
-
再次发送消息,仍然是一个客户端收到消息
-
继续发送,剩余的两个客户端也分别收到了消息
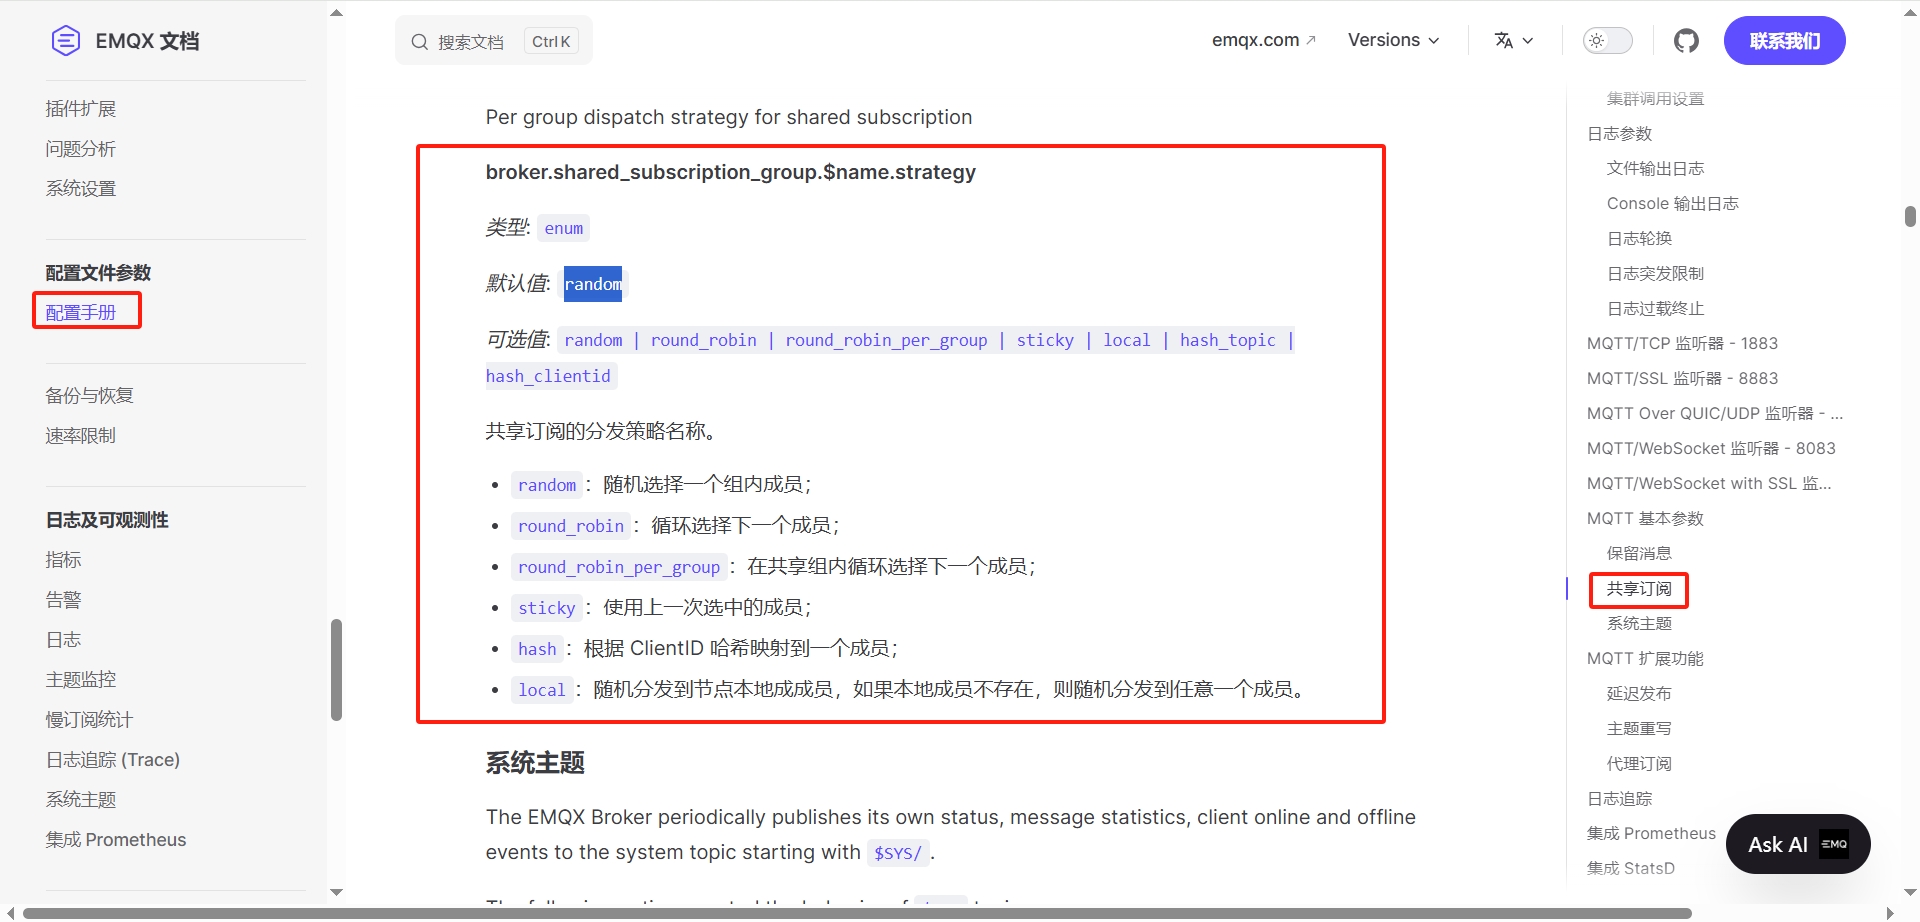
共享订阅有多种策略,默认的策略为随机,具体配置项见共享订阅配置参数
2. 客户端断开重连丢失已订阅Topic
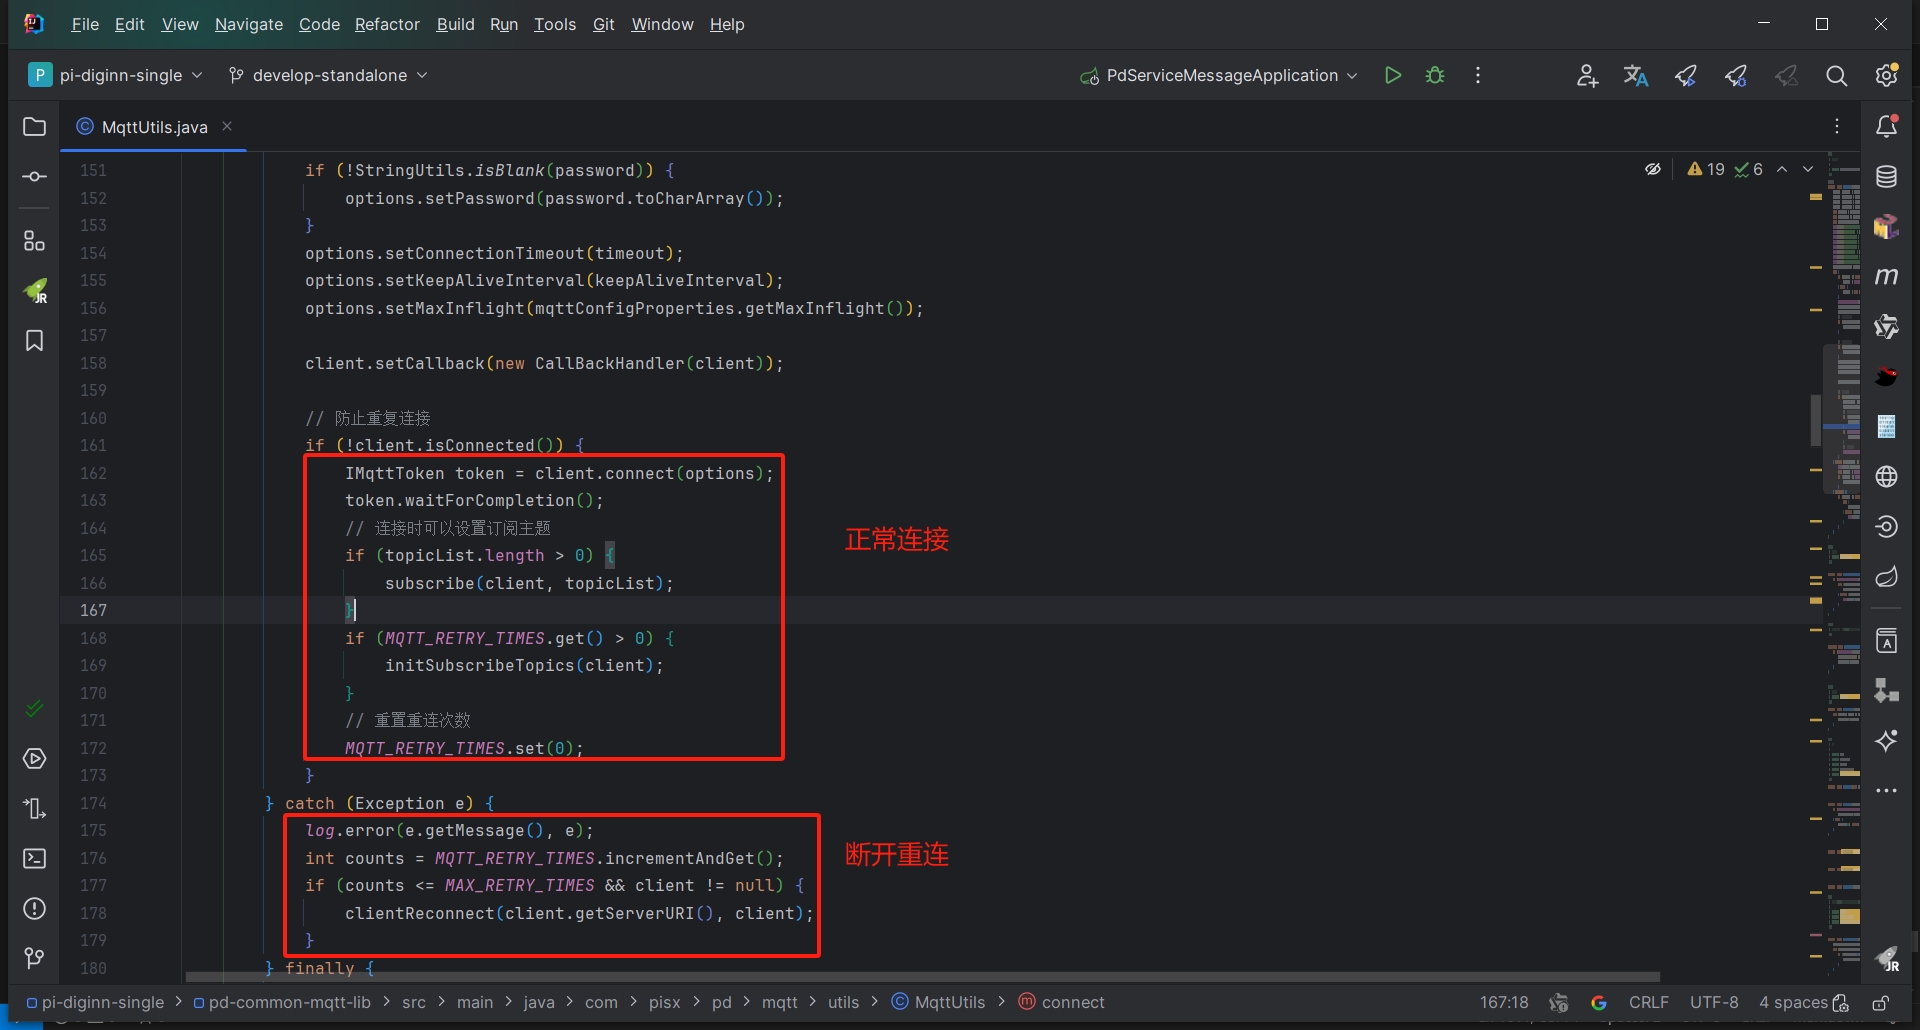
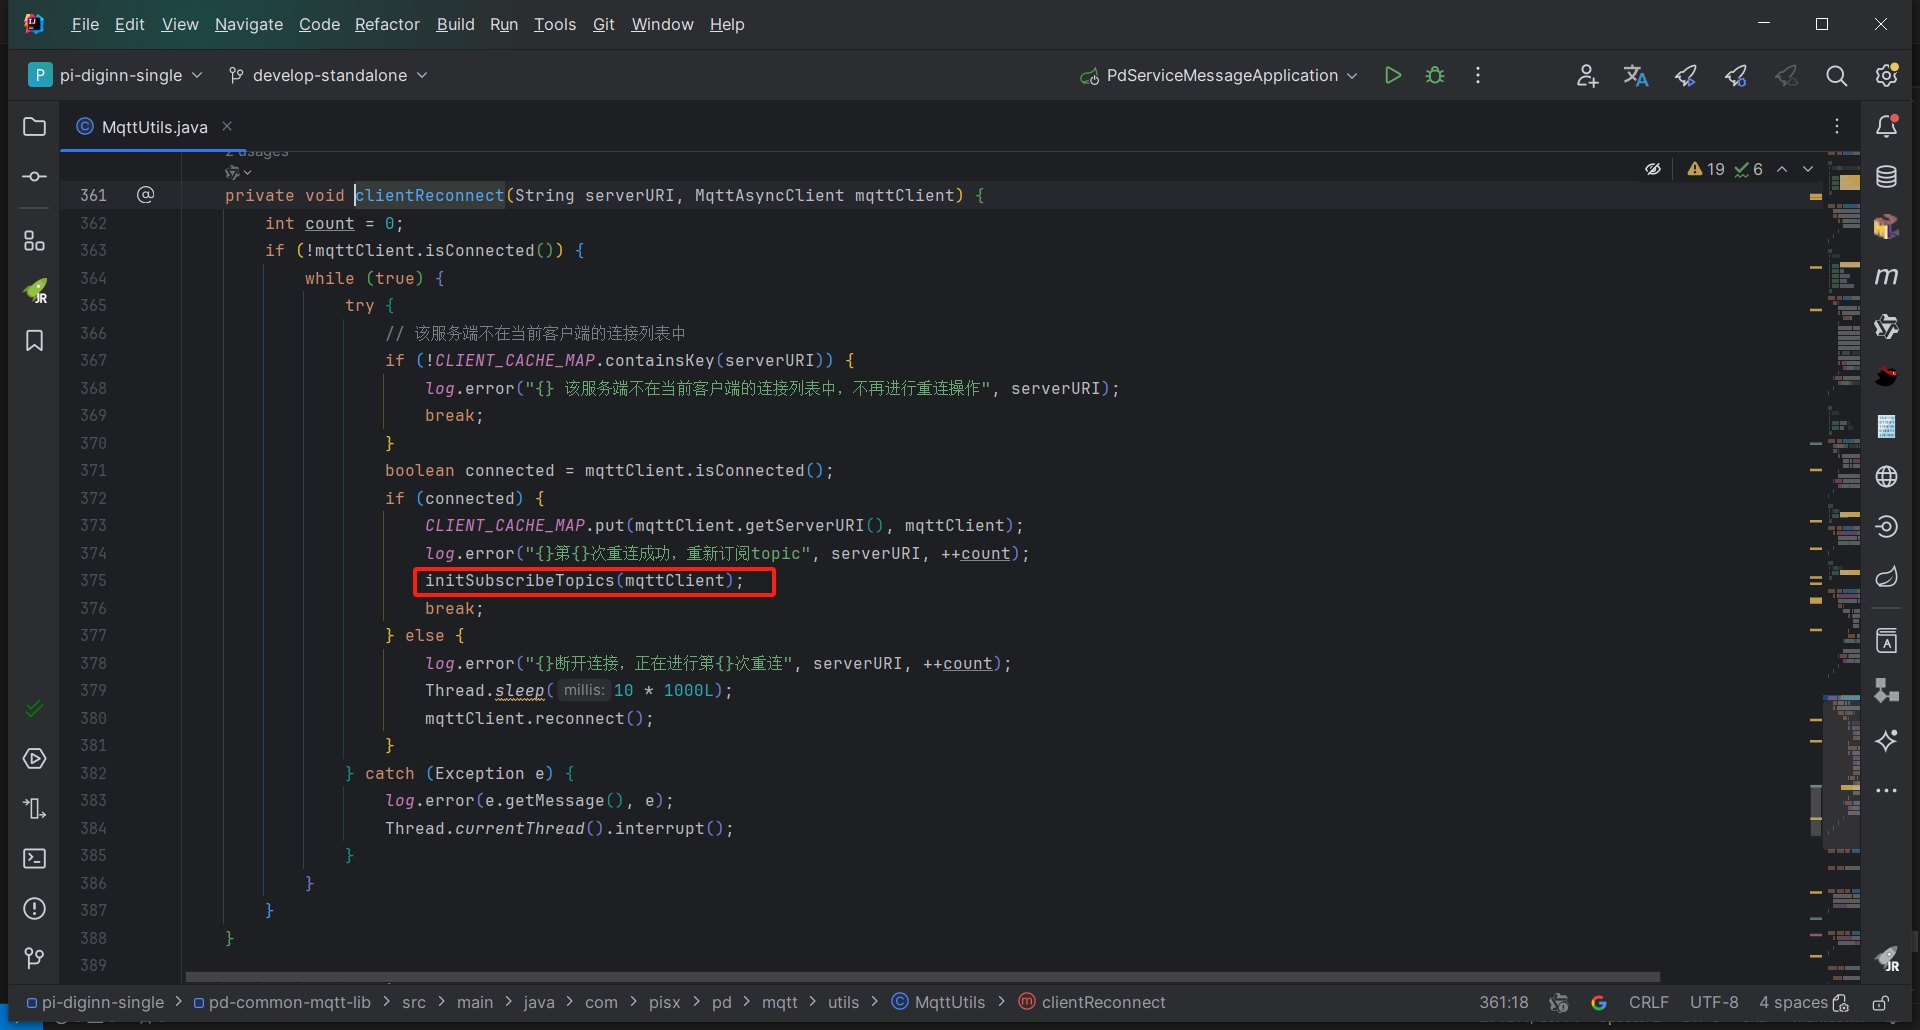
搭建EMQX集群是为了实现EMQX服务的高可用,需要考虑部分服务端节点意外中断的场景,在此场景下,使用Nginx或者HAProxy可以实现客户端的自动重连,对服务端的切换无感,但是由于消息订阅属于客户端的行为,集群并不能保证连接到新的节点时自动订阅相同的Topic。
经测试,目前平台在订阅消息后缓存当前客户端所有的Topic,重连时继续重新订阅这些Topic可以达到此目的,无需额外的开发工作,注意配置即可
订阅断开时会抛出异常,在异常处理中执行重新连接逻辑
重连成功后再次订阅之前缓存的Topic
但是由于 断�开 - 重连 - 重新订阅 这个过程会消耗一定的时间,在这个过程中可能会有部分点位数据的丢失,这个时间间隔大约为 15s。
十一、常见问题
1. 服务启动失败
使用 emqx console 命令启动,可以看到命令行打印如下日志
[root@emqx-01 emqx]# ./bin/emqx console
WARNING: Default (insecure) Erlang cookie is in use.
WARNING: Configure node.cookie in /opt/emqx/etc/emqx.conf or override from environment variable EMQX_NODE__COOKIE
WARNING: NOTE: Use the same cookie for all nodes in the cluster.
Kernel pid terminated (application_controller) ("{application_start_failure,kernel,{{shutdown,{failed_to_start_child,on_load,{on_load_function_failed,quicer_nif,{error,{load_failed,\"Failed to load NIF library /opt/emqx/lib/quicer-0.1.11/priv/libquicer_nif: 'libatomic.so.1: cannot open shared object file: No such file or directory'\"}}}}},{kernel,start,[normal,[]]}}}")

Crash dump is being written to: /opt/emqx/log/erl_crash.dump...done
解决方法
关于此错误,可以参考这个问题
此类异常通常是缺少依赖包,此处是缺少 libatomic,安装后再次运行即可
yum install -y libatomic
2. 服务启动后过几分钟回自动停止
使用 emqx console 命令启动,可以看到命令行打印如下日志
[root@emqx-01 emqx]# ./bin/emqx console
WARNING: Default (insecure) Erlang cookie is in use.
WARNING: Configure node.cookie in /opt/emqx/etc/emqx.conf or override from environment variable EMQX_NODE__COOKIE
WARNING: NOTE: Use the same cookie for all nodes in the cluster.
Erlang/OTP 26 [erts-14.2.5.2] [emqx] [64-bit] [smp:4:4] [ds:4:4:8] [async-threads:4] [jit:ns]

Listener tcp:default on 0.0.0.0:1883 started.
Listener ssl:default on 0.0.0.0:8883 started.
Listener ws:default on 0.0.0.0:8083 started.
Listener wss:default on 0.0.0.0:8084 started.
Listener http:dashboard on :18083 started.
EMQX 5.8.5 is running now!
Restricted Eshell V14.2.5.2 (press Ctrl+G to abort, type help(). for help)
v5.8.5(emqx@192.168.137.101)1> OS monotonic time stepped backwards! Maybe add '+c false' in vm.args
Previous time: 1019146450559
Current time:  1019146449647
[os_mon] cpu supervisor port (cpu_sup): Erlang has closed
[os_mon] memory supervisor port (memsup): Erlang has closed
已放弃 (核心已转储)
解决方法
关于此错误,可以参考这个问题
对于部分版本的 EMQX,在 VirtualBox 中运行时会出现时钟回拨,导致 Erlang 虚拟机退出运行,从而导致 EMQX 退出,使用 5.0.24 版本重试
3. 集群节点连接失败
使用 emqx console 命令启动,可以看到命令行打印如下日志
2025-03-12T10:53:53.661061+08:00 [info] Ekka(AutoCluster): discovered nodes are not responding: ['emqx@192.168.137.101']
在排除服务原因和网络原因后,检查配置文件中 node.name 是否包含数组,如果包含数字,开放的端口需要将这个数字加上
注意: 如果节点名称中有数字,则 Erlang 传输端口和 RPC 端口需要加上数字,例如: 节点名为 emqx-01 则需要开放 4371 和 5371 端口
4. HAProxy 启动报错
[NOTICE]   (15572) : Initializing new worker (15574)
[NOTICE]   (15574) : haproxy version is 3.1.5-076df02
[NOTICE]   (15574) : path to executable is /usr/local/haproxy/sbin/haproxy
[ALERT]    (15574) : [haproxy.main()] Cannot raise FD limit to 2048043, limit is 1024.
[NOTICE]   (15572) : haproxy version is 3.1.5-076df02
[NOTICE]   (15572) : path to executable is /usr/local/haproxy/sbin/haproxy
[WARNING]  (15572) : Failed to load worker!
解决方法
系统里的能打开的文件描述符太小,程序里的比较大,需要调整程序的 maxconn 或系统的 ulimit -n